
Twitch is a fascinating online platform that allows you to watch and interact with your favorite streamers in real time. The medium attracts millions of viewers every month and continues to grow at unprecedented levels.
If you’ve ever considered getting into streaming, you should know that it can be a very daunting endeavor at first. Just thinking about all the necessary equipment and complicated software can be discouraging.
However, streaming comes with a bunch of advantages that can get you in front of the camera. With the massive audience potential, you can build a community from your content and eventually establish a steady source of income.
Why Should You Choose Twitch Over Other Streaming Platforms?
Twitch reigns as the most popular live streaming- service provider for several good reasons. Although platforms like Caffeine and Mixer offer a unique set of features, Twitch has them beat in terms of sheer viewership and brand recognition.
You can think of it this way: choosing a different provider is like having a channel on Vimeo instead of YouTube. While using a lesser-known option means fewer competitors, it also amounts to less room for growth. You might get more initial views, but you’ll get far less overall traffic.
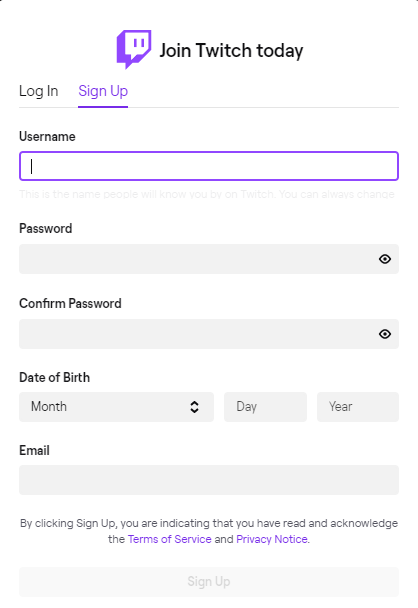
1. Create a Twitch Account
The first thing you need to do is to create a Twitch account. This procedure is pretty straightforward:
- Go to https://www.twitch.tv and click the Sign Up button at the top-right corner of the page.
- Fill out the form by entering your desired username and password, as well as your date of birth and email address.
3. Verify your email address.
We recommend that you go over the Twitch Community Guidelines before you start streaming so you can be fully informed on rule violations like the promotion of racist, homophobic, and ageist views. You are also required to do your best to prevent your audience from engaging in hateful speech and harassment.
2. Download Streamlabs OBS
Streamlabs OBS is one of the most popular streaming software for beginners and professional streamers alike. We chose Streamlabs OBS specifically for this guide as it is recognized by many as the most user-friendly streaming tool while providing tons of advanced features.
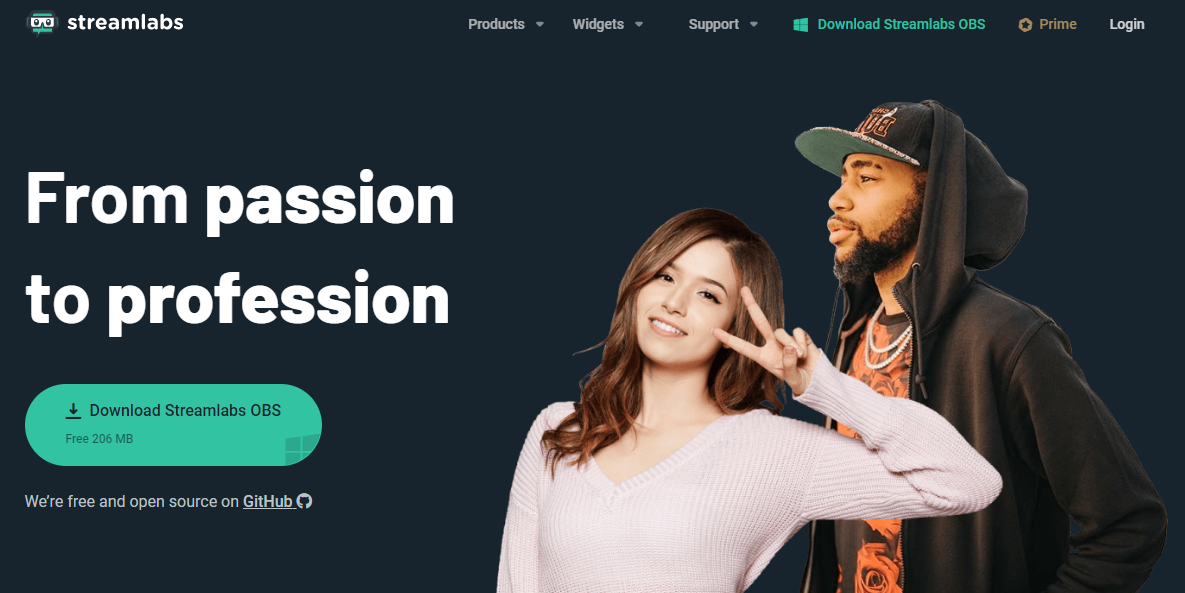
- Go to https://streamlabs.com/ and download Streamlabs OBS.
- Install and start the program.
- Log in to the program using your Twitch account.
- Skip everything on the initialization page as we’re going to show you how to customize the settings manually later.
Streamlabs OBS contributes significantly to the quality of your stream, so we’re going to discuss the program extensively. We’re going to go over the settings, graphics, and alerts, as well as providing a few tips along the way to make your stream look as professional as possible.
3. Customize Streamlabs OBS Settings
StreamlabsOBS provides an enhanced user experience without overwhelming you with unnecessary complexities. It is the easiest streaming software to work with, especially for beginners.
The first thing you should do after logging into Streamlabs OBS is to change a few settings.
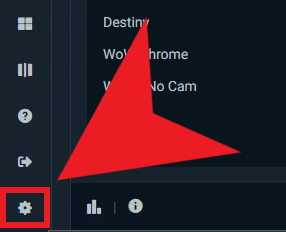
Click the gear icon located at the bottom left corner of the interface to access the settings window.
The settings we discuss below are those that need to be changed so you can start streaming as soon as possible. (You can experiment with or leave as default the setings we don’t deal with here.)
General
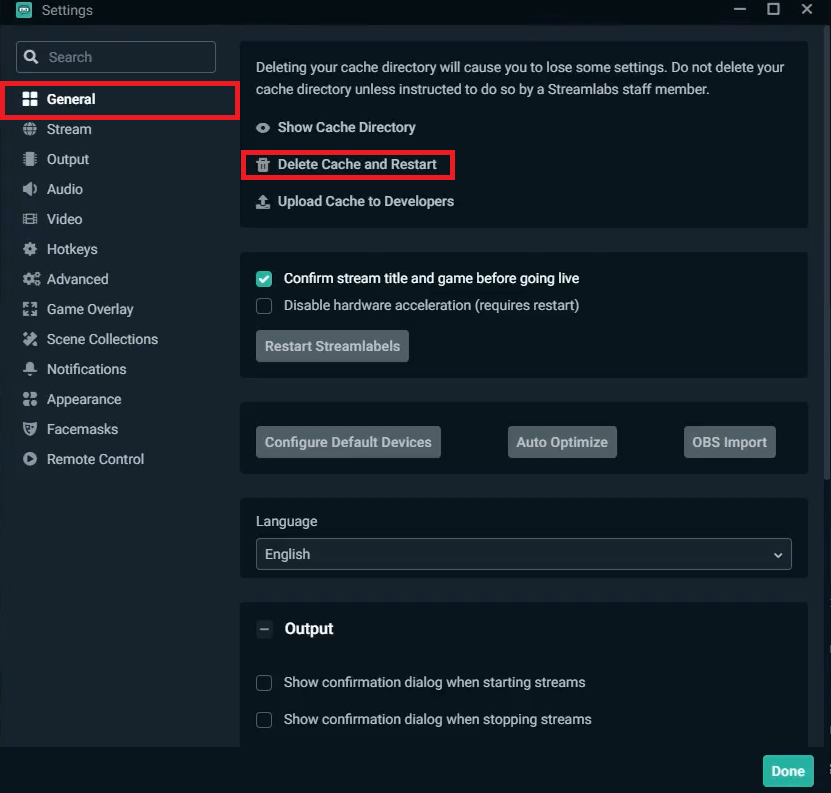
The first tab contains all the general settings such as language and cache directory. You don’t have to change anything in this section, but it’s good to know that you can easily revert to default settings by deleting the cache and restarting.
Audio
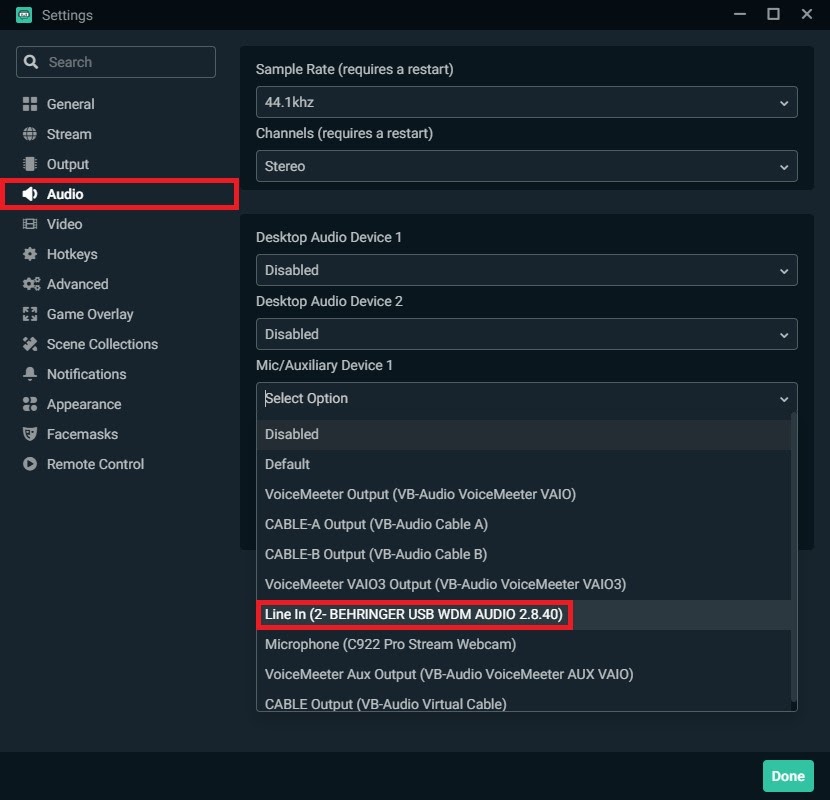
Whether you’re using a headset or a dedicated condenser microphone, the next thing you should do is link your audio input device:
- Go to the Audio tab.
- Select your microphone from the Mic/Auxiliary Device 1 drop-down menu.
In the image above, the microphone is connected via a USB audio interface. You should encounter a similar option if you’re also using one.
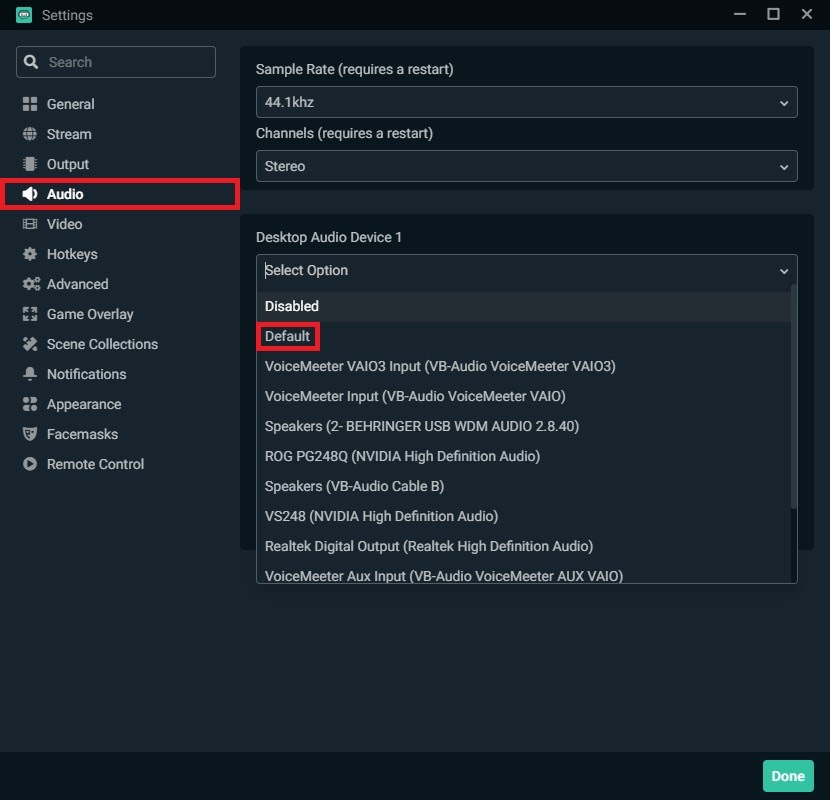
Leave Desktop Audio Device 1 to the Default setting appropriate for your system audio (e.g., in-game sound or desktop sound).
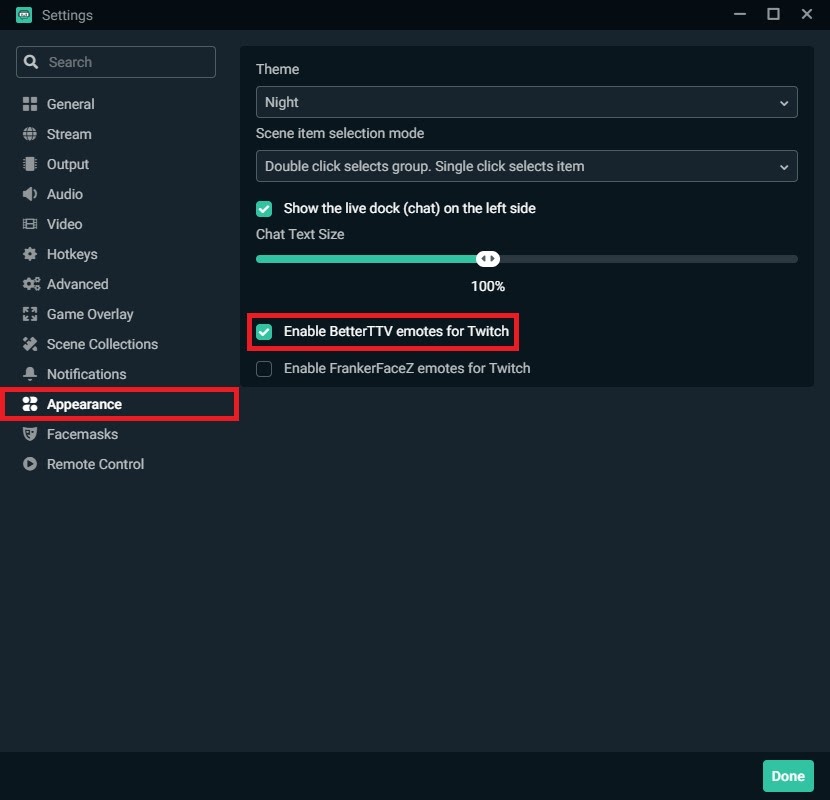
Appearance
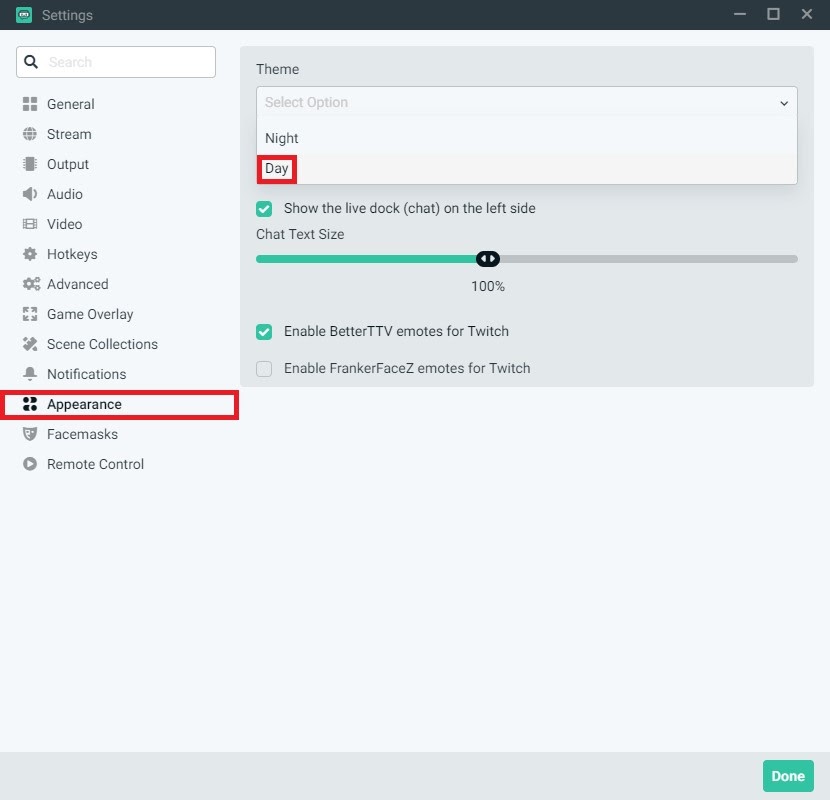
If you’re not keen on the default dark interface, you can change the theme in the Appearance tab. Also, make sure you enable BetterTTV emotes for Twitch to make your chat more fun and engaging for your viewers.
Output
The Output Tab is where most beginners scratch their heads in frustration because of how complicated it can be to set up. Fortunately for you, we are going to be very meticulous in explaining this section. Although this part of the guide is quite lengthy, you’re going to have a good understanding of what everything does after giving it a good read.
What are Output Settings?
Video bitrate is the speed at which you send data to the streaming servers. It is measured in kilobits per second (kbps) and relies on your Internet upload speed. Video bitrate is a very important aspect of your stream quality, so it is crucial that you understand how it works.
In essence, streaming with faster bitrate amounts to higher-quality video. To put this concept in perspective, streaming in 1080p 60 fps (1080p60) requires a bitrate of 6000 kbps while streaming in 720p 60 fps (720p60) requires only 4500 kbps.
What is Video Bitrate?
Video bitrate is the speed at which you send data to the streaming servers. It is measured in kilobits per second (kbps) and relies on your internet upload speed. Video bitrate is a very important aspect of your stream quality, so it is crucial that you understand how it works.
In essence, streaming with faster bitrate amounts to a higher quality video. To put this concept into perspective, streaming in 1080p 60 fps (1080p60) requires a bitrate of 6000 kbps, while streaming in 720p 60 fps (720p60) requires only 4500 kbps.
If it’s that simple, then why doesn’t everyone stream at the highest bitrate possible?
Well, you have to consider the fact that some of your viewers don’t have access to a fast-enough Internet connection to keep up with your bitrate. High-resolution videos demand more bandwidth, and if your viewers don’t have the download speed to match your bitrate, they will most likely have a rough viewing experience with a lot of buffering.
A feature called transcoding lets your audience view your stream in a different resolution quality from that of the source. However, this option is available only to Twitch partners.
What is the Recommended Video Bitrate?
The ideal video resolution to accommodate viewers with slow Internet is 720p60. This configuration requires a bitrate of only 4500 kbps, so anyone with a 5000 kbps Internet download speed or faster is ensured a smooth viewing experience.
The image below shows the configuration you must follow to stream in 720p60. You can check the recommended settings for other resolutions in this encoding chart, but we highly recommend going with 720p60.
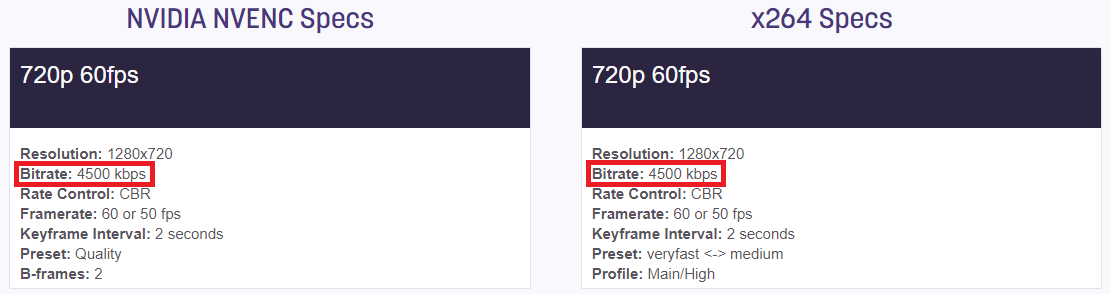
In case you’re wondering why there are two separate columns, Hardware NVENC New is the proprietary video encoder for NVIDIA GPUs. We’ll get more into this later, but follow the specifications for NVIDIA NVENC New if you have a GeForce RTX Series GPU.
Setting Base and Output Resolutions
Before you change the output settings, go to the Video tab first, and follow these steps:
- Set Base (Canvass) Resolution to the native resolution of your monitor.
- Set Output (Scaled) Resolution to 1280×720.
- Change Downscale Filter to Lanczos.
- Change Common FPS Values to 60.
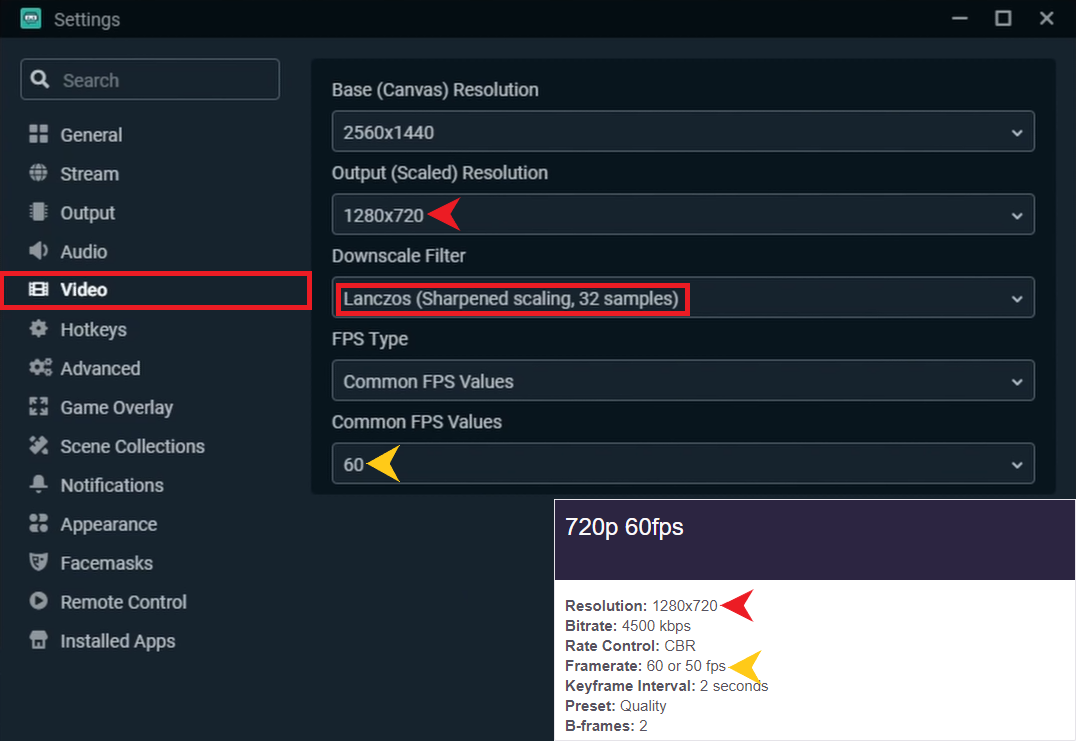
These settings are based on the recommended configuration found in the Twitch encoding chart.
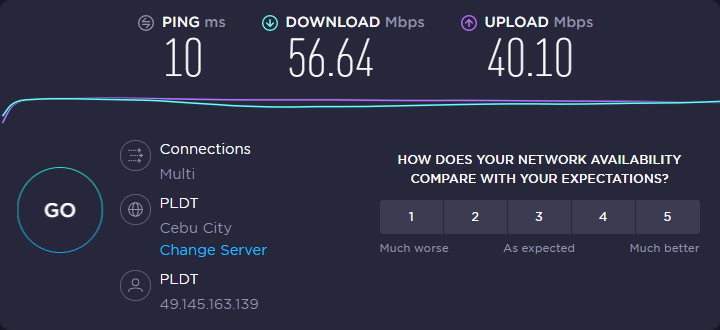
Internet Speed Test
To confirm that your Internet connection can handle streaming at a bitrate of 4500 kbps, you need to test your upload speed. Keep in mind that your maximum upload speed should not reflect the amount of data you can send to the streaming servers since other devices connected to your network are going to take a piece of your Internet capacity. For example, other people in your home may be watching videos or playing online games while you’re streaming. As a rule of thumb, you can allocate 30% of your maximum upload speed for other processes and then use 70% for streaming.
Based on the Twitch encoding chart, the bitrate needed to stream in 720p60 is 4500 kbps. To check your upload speed:
- Go to https://www.speedtest.net/.
- Click on Go to start the test. Your results should look like this:
3. Multiply your upload speed by 700.
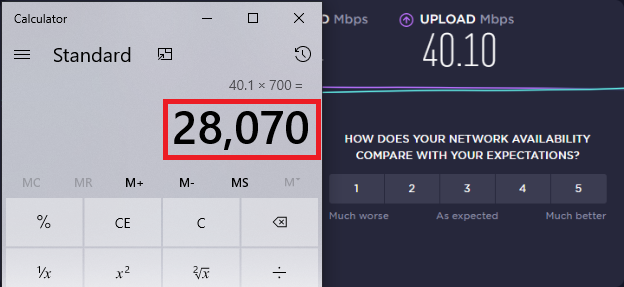
From our test results, you can tell that our internet connection is more than capable of going over the maximum bitrate of Streamlabs OBS (6000 kbps) as well as the recommended streaming bitrate of 720p60 (4500 kbps). If your Internet connection is too slow for streaming in these settings, try aiming for 720p30 instead (3000 kbps).
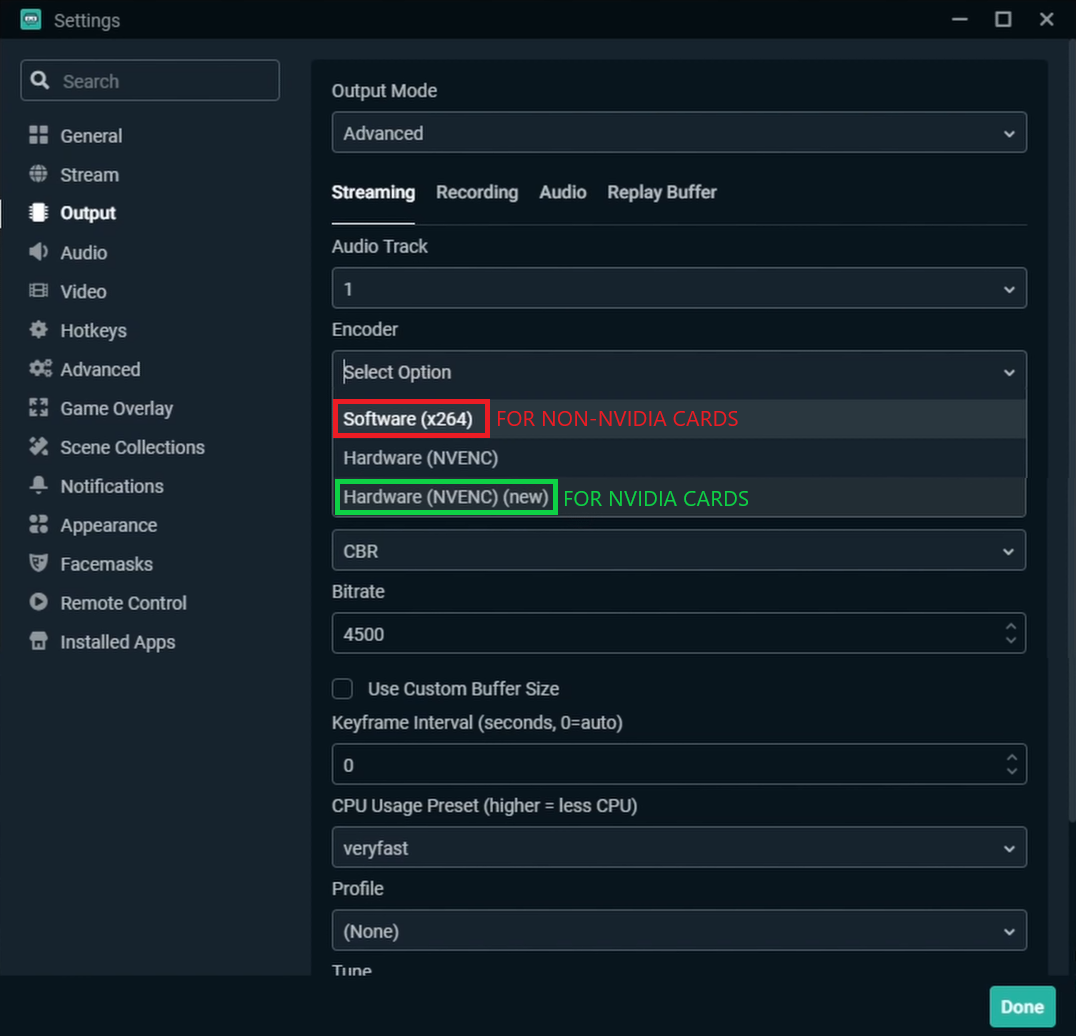
Once you’ve figured out the best resolution for your Internet connection, go back to Streamlabs OBS and open the Output tab. Make sure you set Output Mode to Advanced so you can input all the settings manually.
Setting Your Encoder
We’ll discuss the different encoders in more detail later, but the important thing to know for now is that the encoder you should use if you have an NVIDIA RTX Series GPU is Hardware (NVENC) (new).
Recommended Hardware (NVENC New) Settings
- Disable Enforce streaming service encoder settings.
- Change Rate Control to CBR.
- Set Bitrate to 4500.
- Set Keyframe Interval to 2.
- Change Preset to Quality or Max Quality.
- Disable Look-ahead.
- Enable Psycho Visual Tuning.
- Set Max B-frames to 2.
Recommended Software (x264) Settings
Now, let’s go over the output settings if you’re not using an NVIDIA GPU. Before anything else, change your encoder to Software (x264) and follow these steps:
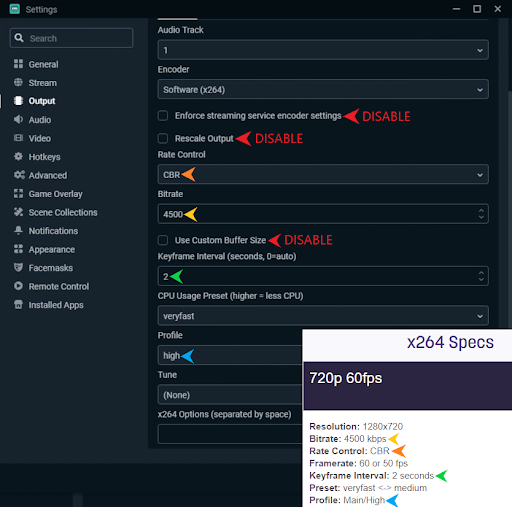
- Disable Enforce streaming service encoder settings.
- Disable Rescale Output.
- Change Rate Control to CBR.
- Set Bitrate to 4500.
- Disable Use Custom Buffer Size.
- Set Keyframe Interval to 2.
- Set Profile to high.
That leaves us with the most complicated setting: the CPU Usage Preset.
We could explain exactly how this setting affects your stream, but we’d need an entirely separate article for that. What you need to know is that the slower you set your usage preset, the better the quality of your stream, but the harder it will be for your CPU.
This step requires a bit of testing, but we’ll help you go through the entire process:
- Open your Task Manager [Ctrl+Shift+Esc].
- Go to the Performance tab.
- Launch all the programs you’ll be using for streaming.
- Start your game and go live.
- Play for at least 10 minutes.
- Go back to Task Manager and check the CPU Usage numbers when you were streaming.
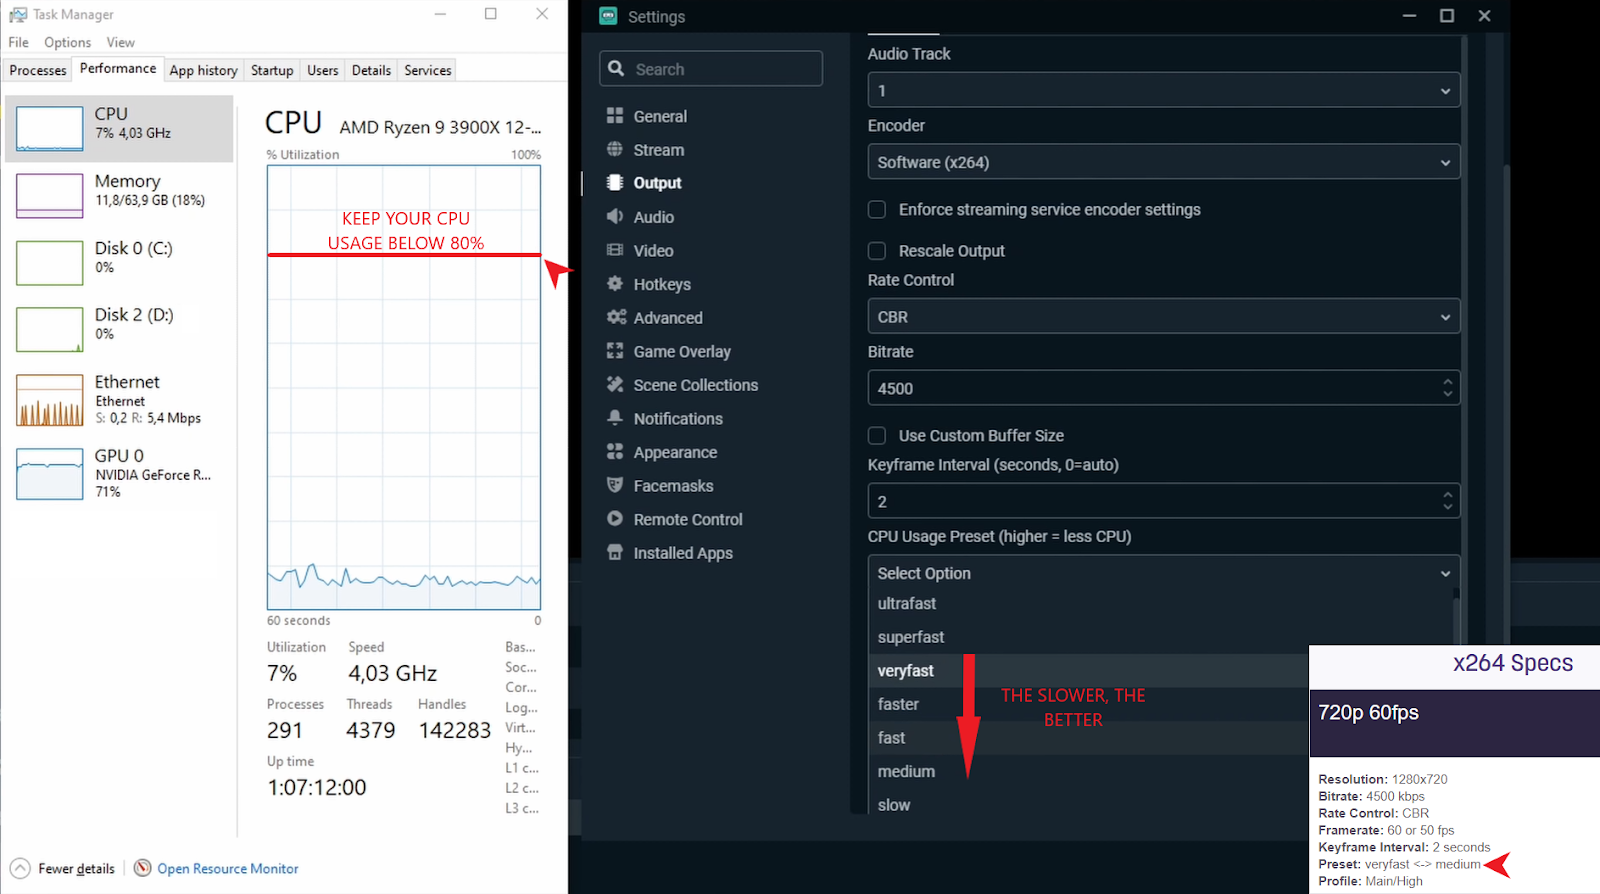
The whole idea is to keep your CPU usage from going over 80%. So if you have a ton of room left, change the preset to faster, fast, or medium until you find your sweet spot.
Hardware (NVENC New) vs. Software (x264) Encoder
Before, streamers had only two options for video encoding: Hardware (NVENC) and Software (x264). NVENC depended heavily on the GPU to handle encoding while x264 was the more CPU-intensive alternative. Both encoders had their respective upsides, but x264 was the more popular option among streamers. Although x264 hurt your system performance, it allowed for more detail and clarity on your stream. On the other hand, NVENC may have had minimal effect on your performance, but took a toll on your stream quality.
However, the latest version of the encoder from NVIDIA called NVENC New is 66% faster than its predecessor and offers new features like Look-ahead and Psycho-Visual Tuning.
How Does NVENC New Fare Against x264?
They’re pretty even in a lot of aspects, but NVENC New has the edge when it comes to video-game streaming. It is much better at handling rapid changes in fast-paced games and also makes text elements more legible.
However, you must consider that NVENC New encoding is available only for NVIDIA GeForce RTX GPUs. At the time of writing, you could get an RTX 2060 for around $400 while an AMD Ryzen 7 2700X, a very capable streaming CPU with eight cores and hyperthreading support, was listed for nearly half the price.
In a nutshell, if you already have an RTX GPU or can afford to get one, the NVENC New encoder is an excellent feature to have. If you have a restricted budget, spend the money on a powerful CPU, and the x264 encoder will do you just fine.
Is It Worth Getting an NVIDIA Graphics Card for the NVENC New Encoder?
Yes, of course. The NVIDIA is one of the most powerful consumer graphics cards currently available, and the performance it offers is worth the money alone. Gaming is an experience all in itself and this card just adds that extra layer of enjoyment.
Dustin Vann
Owner and CEO at Trusy Social
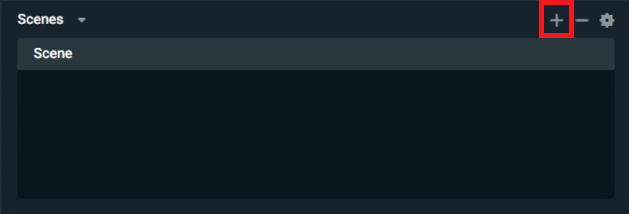
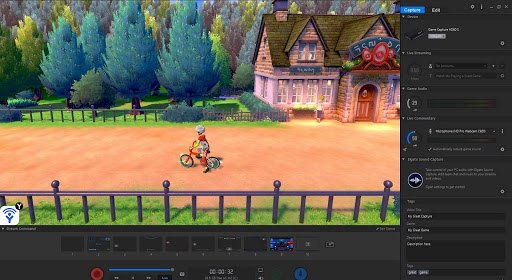
4. Add Scenes to Your Stream
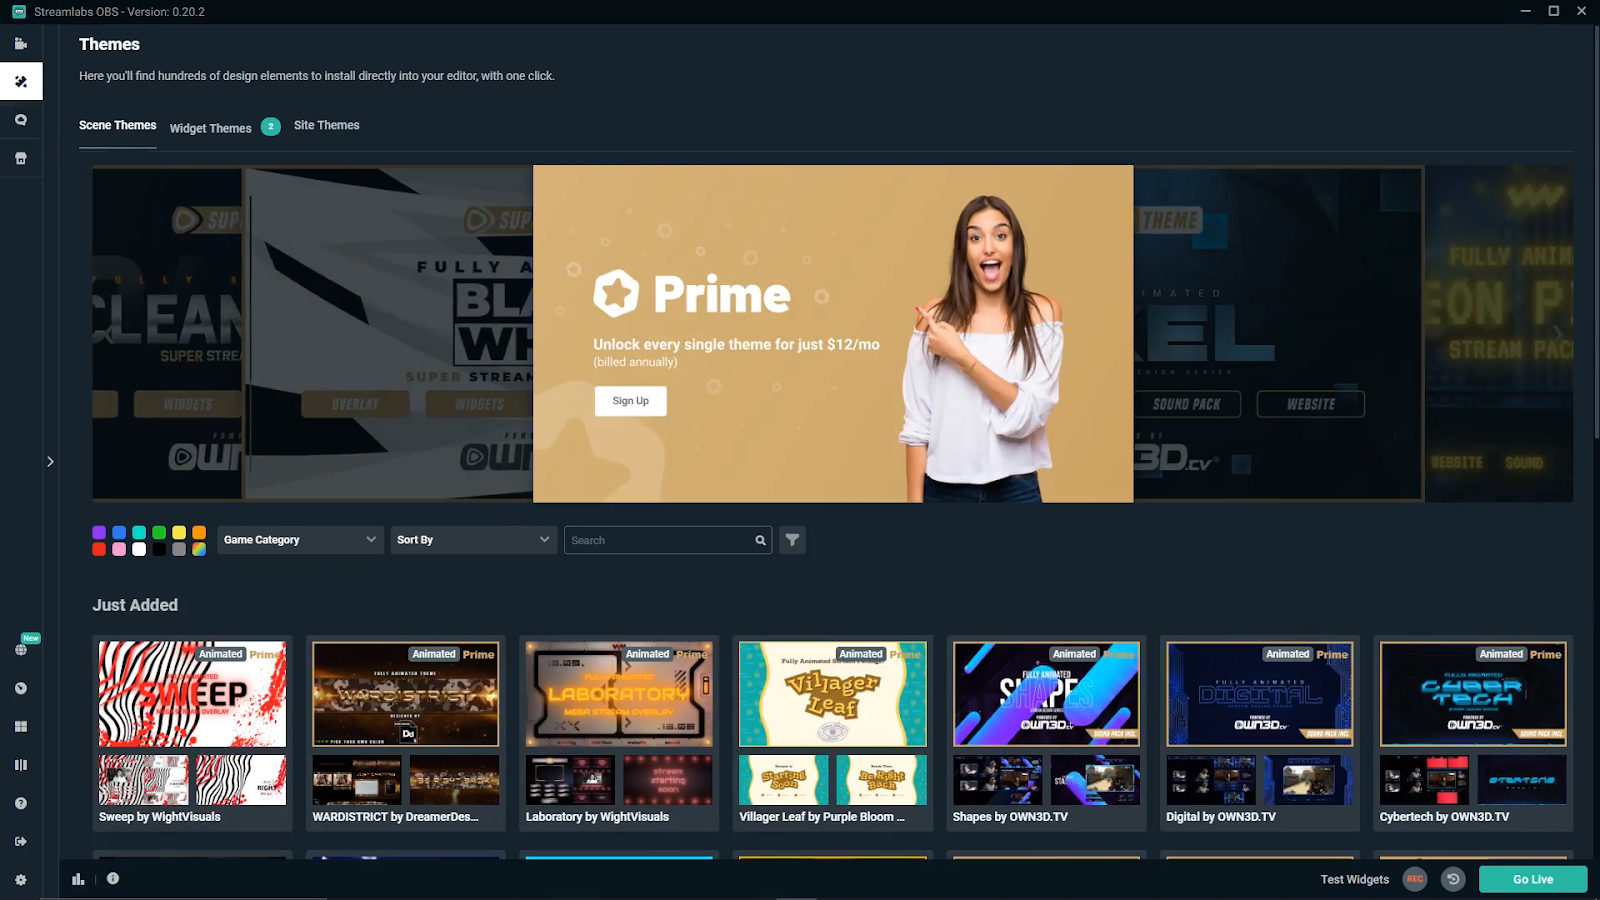
Now that your settings are ready, you can start adding graphics to your stream, such as scenes, transitions, and alerts. We strongly recommend that you get an overlay pack as it will give your stream a more professional look. You can get one of these packs from the Theme section in Streamlabs OBS, or you can download one from a third-party website. Some of the older ones are free while some are available only to Streamlabs Prime members.
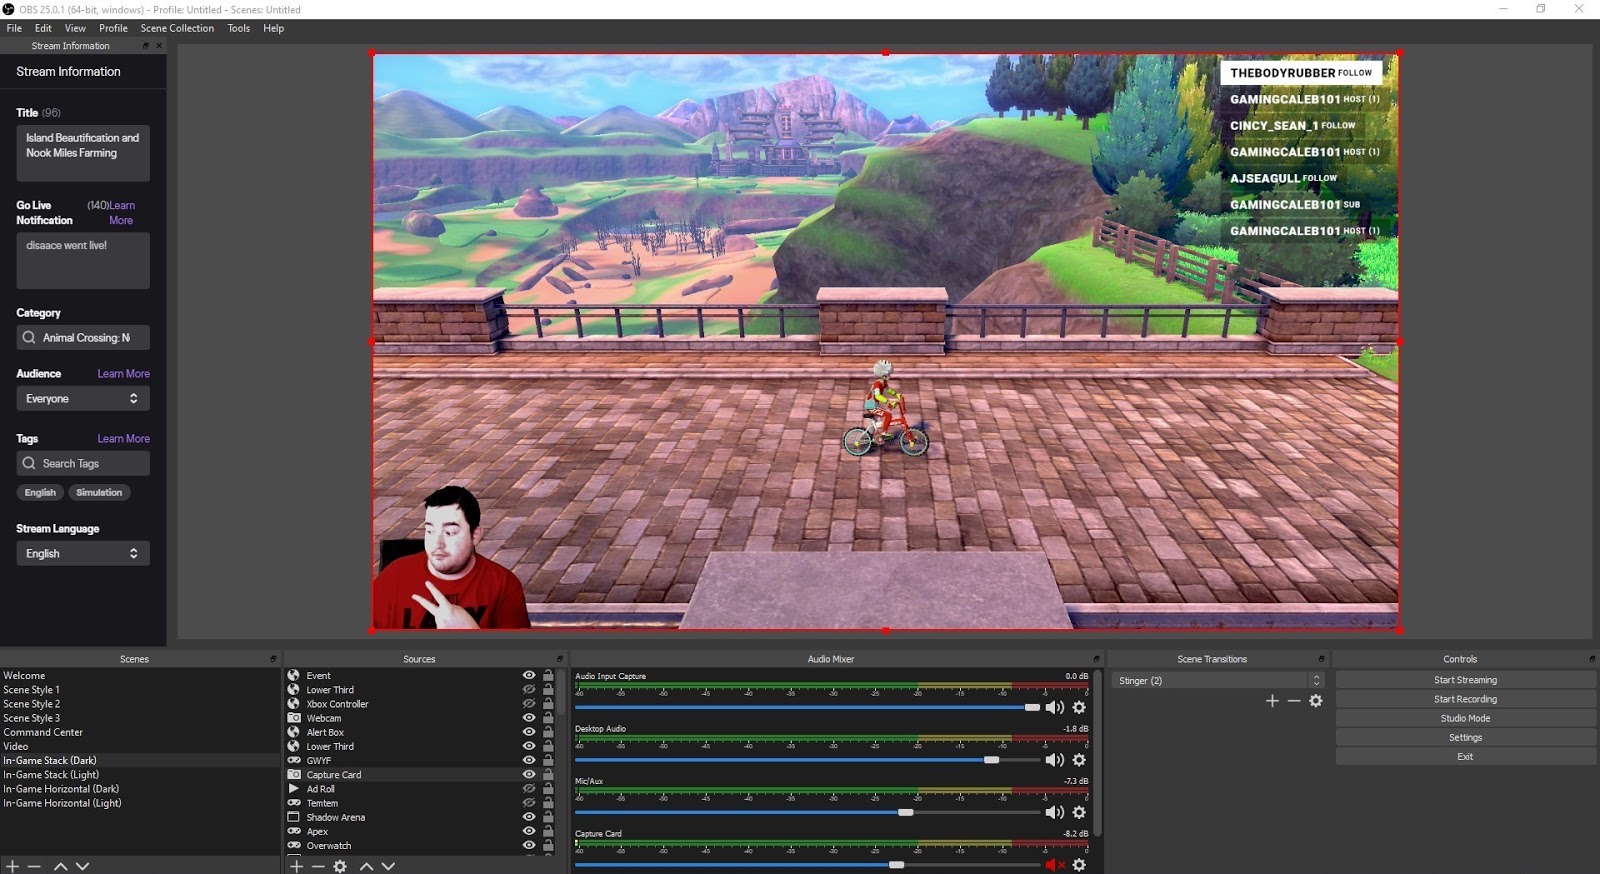
Scenes, Sources, and Mixer
The highlighted section in the image above is where you can add scenes for your stream. Scenes essentially act as a folder to hold graphic elements, known as sources, that you add to your stream.
In the particular example above, you can see the different scenes created for the game World of Warcraft, including game capture (WoW – No Cam), video capture (Full Face), a scene for when you take a break in the middle of a stream (BRB), and several others. We’ll talk at length below about the basic scenes you need to start streaming.
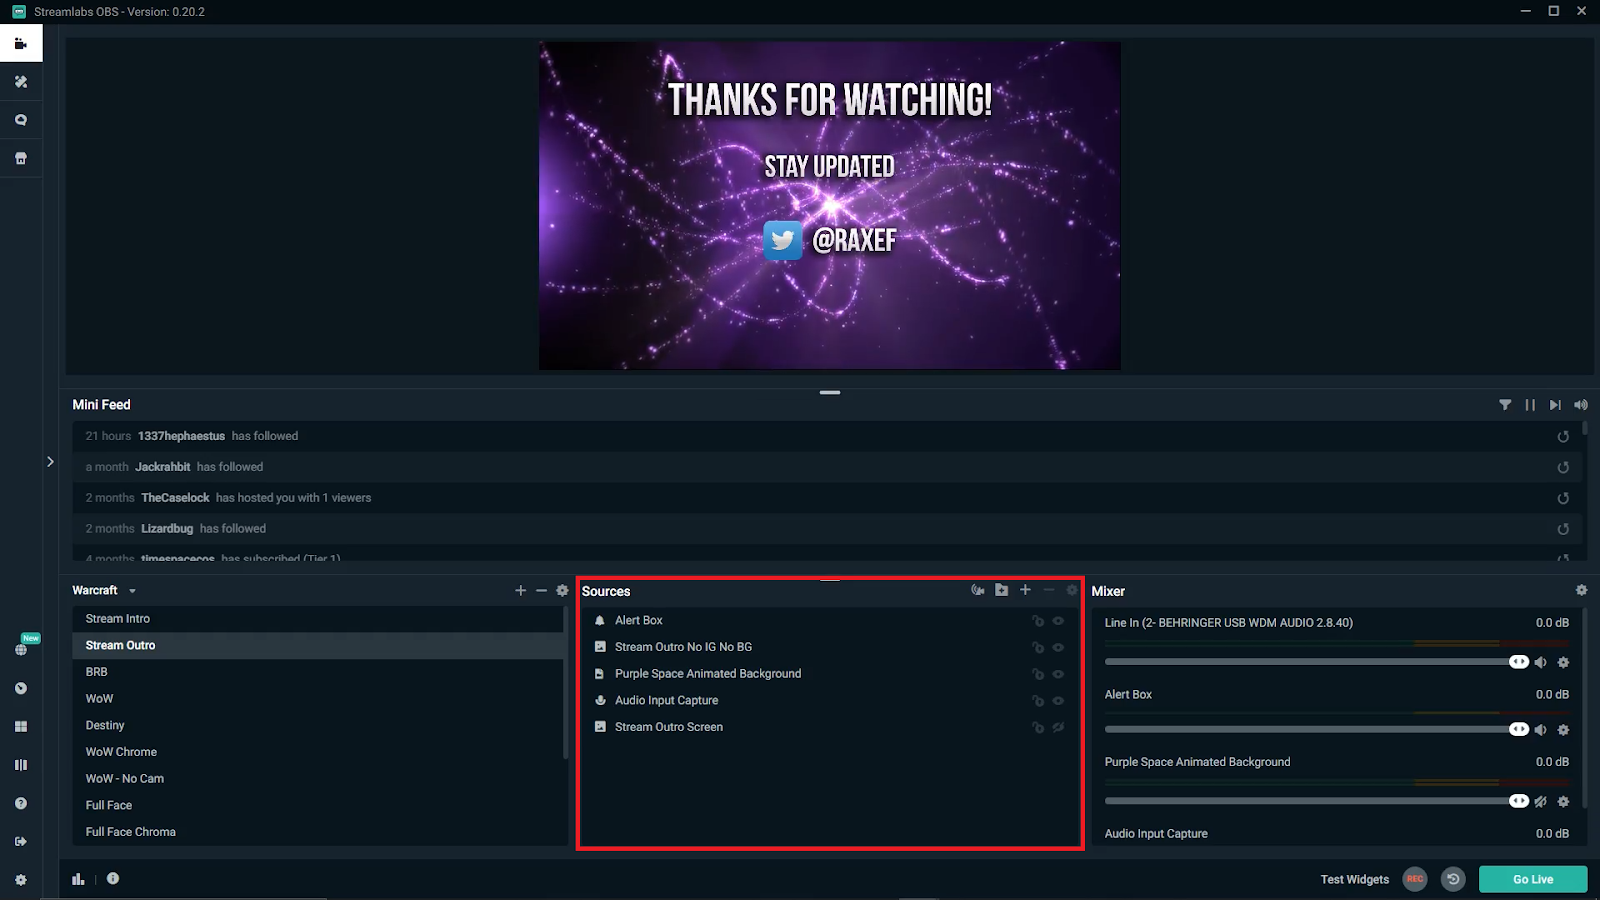
Sources are the elements you add to scenes, such as the feed from your webcam, game capture, alert boxes, borders, and so much more.
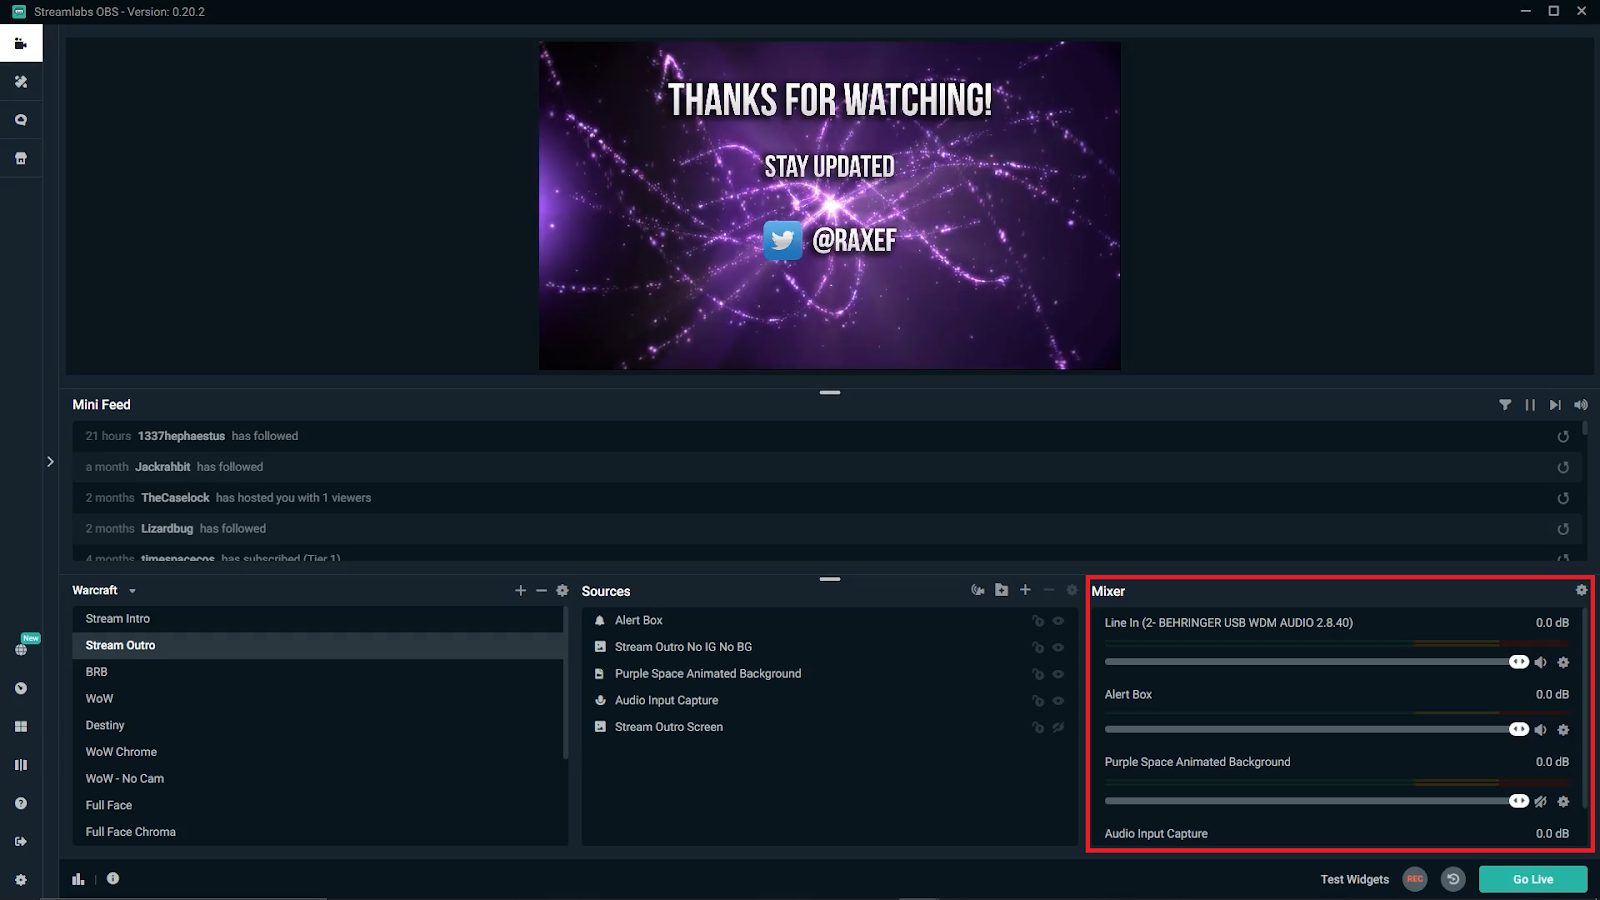
The section on the right is called the Mixer, and it lets you control all of your audio sources like in-game sound and your microphone, which we linked to Streamlabs OBS earlier.
Game Capture
The first scene you should create is your Game Capture.
To add a new scene:
- Click the plus icon at the top right-hand corner of the Scenes section and select Game Capture.
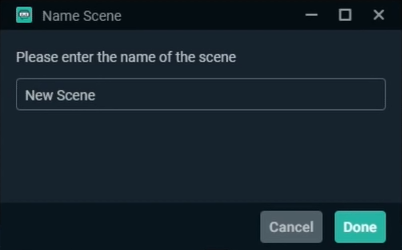
2. Assign a name for your Game Capture scene.
3. Add a new source by clicking the plus icon at the top right-hand corner of the Sources section.
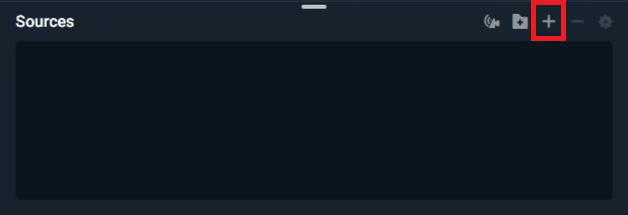
4. Select Game Capture.
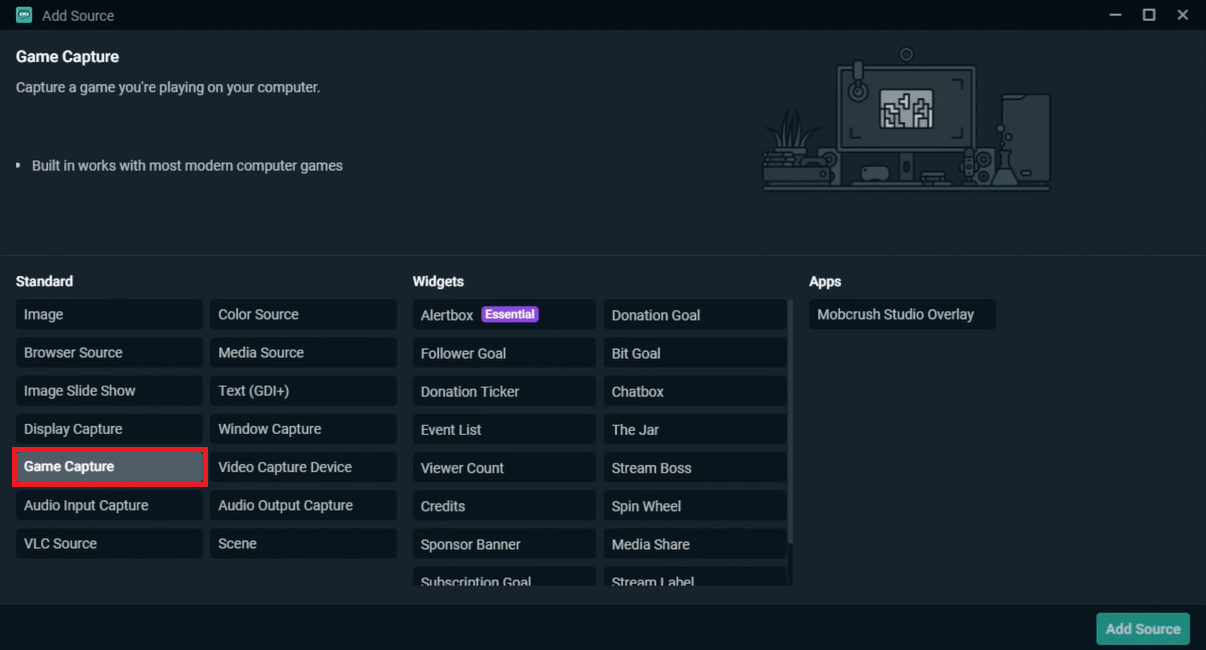
5. Enable Add a new source instead and assign a name for your Game Capture source.
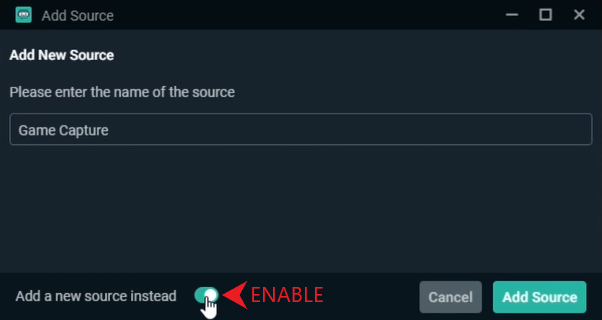
6. Set Mode to Capture specific window.
7. Make sure that your game is running in the background.
8. Select your game from the Window drop-down menu.
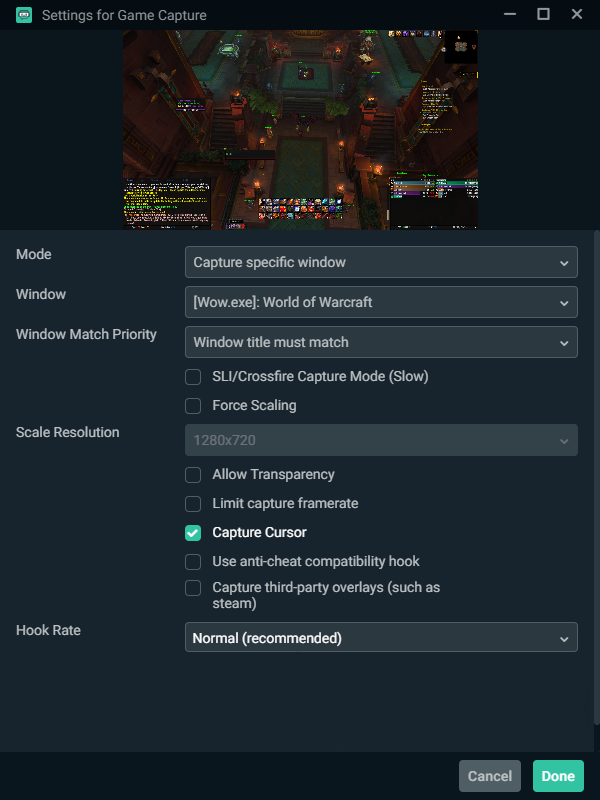
9. Click Done.
If your game doesn’t appear in full screen or not at all, you can right-click the Game Capture source and go to transform and then click Fit to Screen.
Video Capture
The next element you’ll add to the scene is your video capture. Although it is not necessary to stream in front of a webcam, most viewers tend to prefer having a human element behind the game rather than just watching gameplay.
- Add a new source and select Video Capture Device.
2. Enable Add a new source instead and assign a name for your Video Capture Device source.
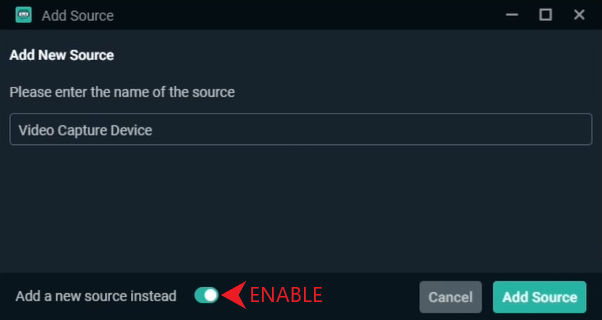
3. Select your webcam from the Device drop-down menu.
4. Click Done.
5. Scale and position your video capture based on the interface of your game. For instance, if your game displays content on the bottom right, place the video capture on the bottom left.
Green Screen
Streaming with a green screen gives your viewers the impression that you’re serious about the craft. A green screen basically isolates you from your natural recorded environment and gives your stream a more professional look by eliminating your background and placing more emphasis on yourself.
How to Set Up a Green Screen
There are plenty of green screens available on the market, and they come in various shapes and sizes. Some can be hung on a scan while others can be fixed to your wall. There are also pull-up green screens that roll into tubes to make them more compact and easier to store.
Since you’re probably going to broadcast in front of your computer desk, you won’t need a large green screen as only your head and part of your upper chest is going to be captured by your webcam. If you’re short on budget, you can use a green cloth or your solid green-colored wall to add the chroma-key effect to your stream.
Setting Up Chroma Key in Streamlabs OBS
Aside from a solid-green background, another essential factor to make the chroma key effective is adequate lighting. If your room is bright enough that your face doesn’t get distorted on stream, that’s great, but if not, you may need to purchase lights for streaming.
- Right-click your Video Capture Device source and select Filters.
- Click the plus icon and add a Chroma Key filter.
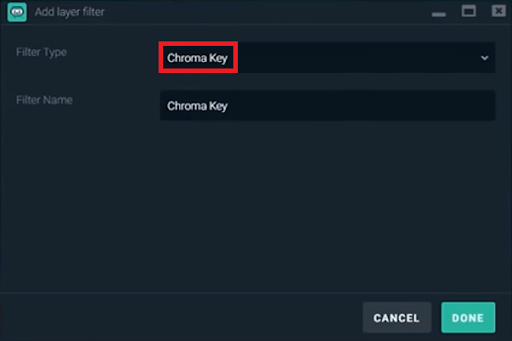
3. Set Key Color Type to Green.
4. Adjust Similarity and Smoothness until you get a good image without any distortion.
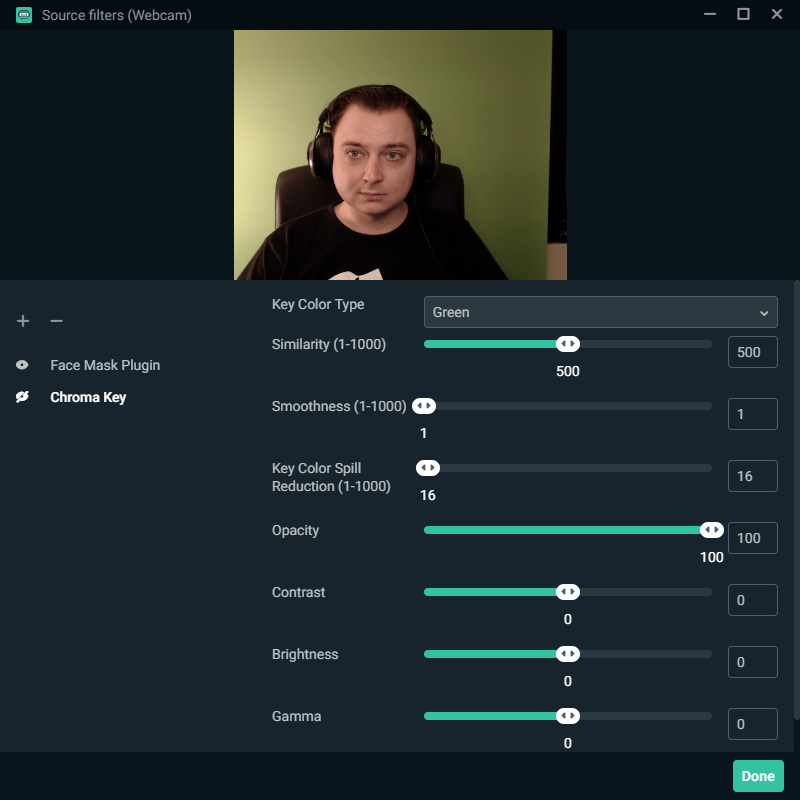
5. Click Done.
BRB Scene
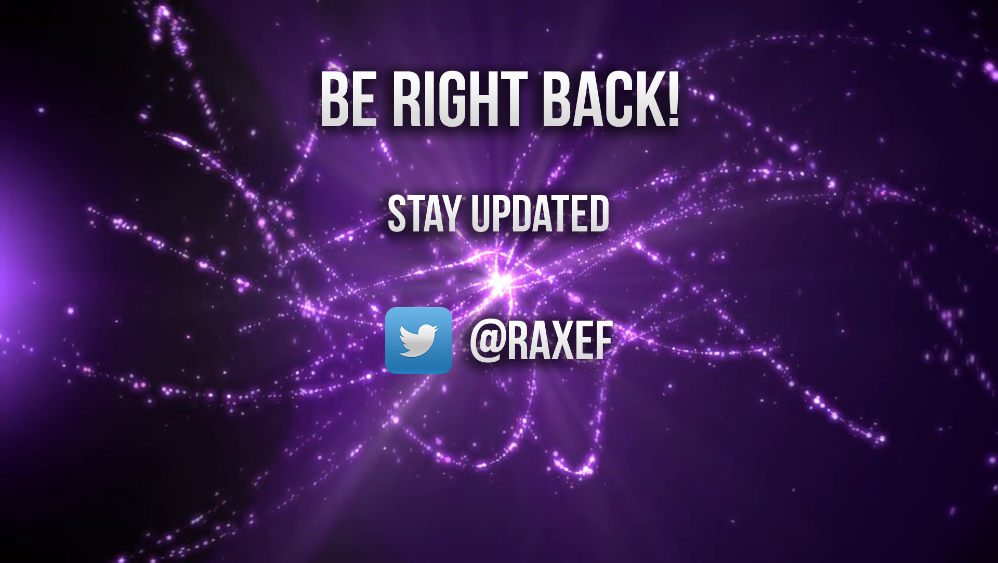
Streaming often means sitting in front of your computer screen for hours on end. At some point, you’re going to have to stand up to use the bathroom or grab a snack. You don’t want these extracurricular activities to be displayed on-screen, but neither do you want to bore your audience with an empty display.
You can make an animated scene with a few graphics here and there, but a basic image with your social media handles is perfectly fine. To make a BRB scene:
- Create an image similar to the one above using your graphics editor of choice.
- Open Streamlabs OBS and add a new scene.
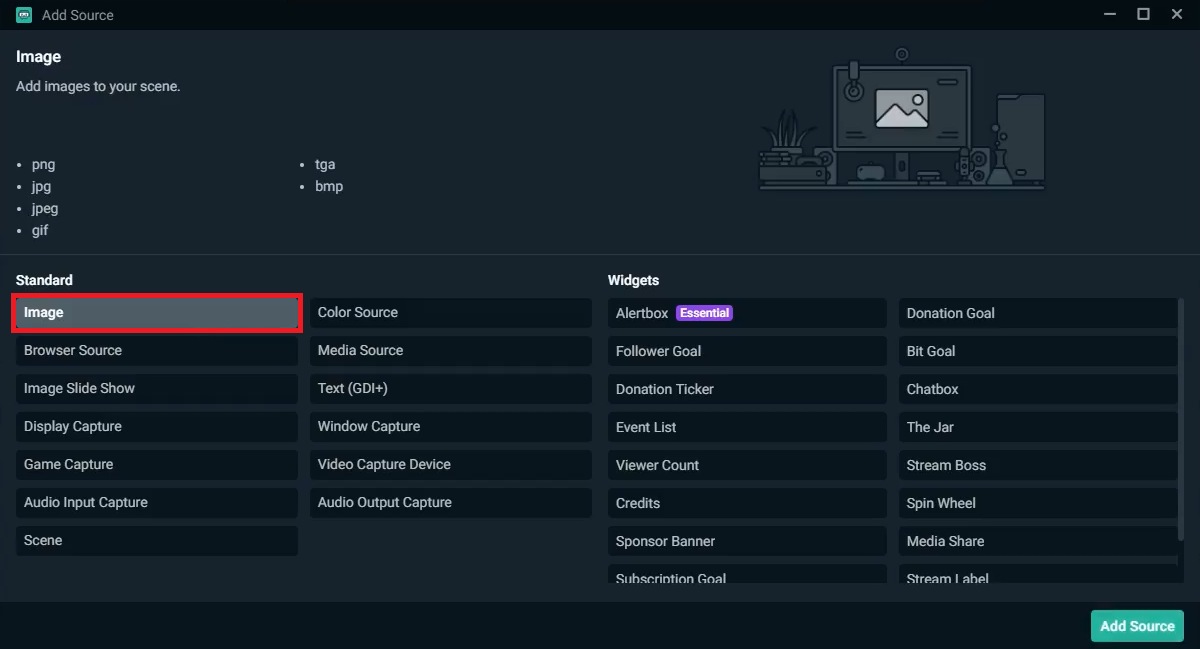
- Add a new source and select Image.
4. Locate the file you created.
5. Click Done.
Stream Labels
Adding stream labels to your scenes is a great way to make your stream more immersive and engaging for your audience. Stream labels are basically dynamic text overlays that update in real time, such as recent followers, recent donations, and many more.
With Streamlabs OBS, adding labels to your stream is extremely easy:
- Add a new source and select Stream Label.
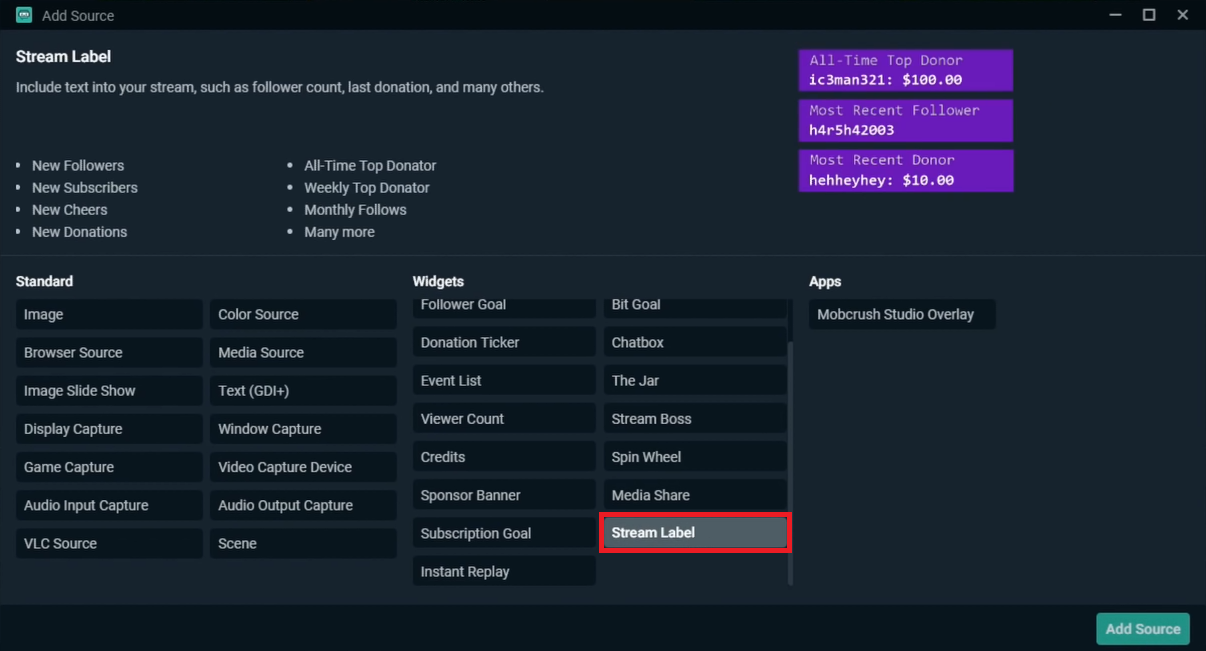
2. Assign a name for the source depending on the label that you want to add (e.g., recent follower, top donation, etc.).
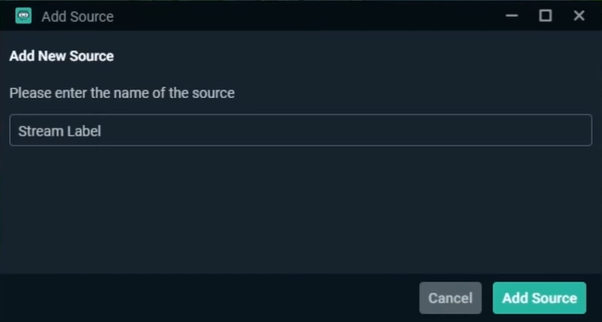
3. Change Label Type to the stream label you want to add.
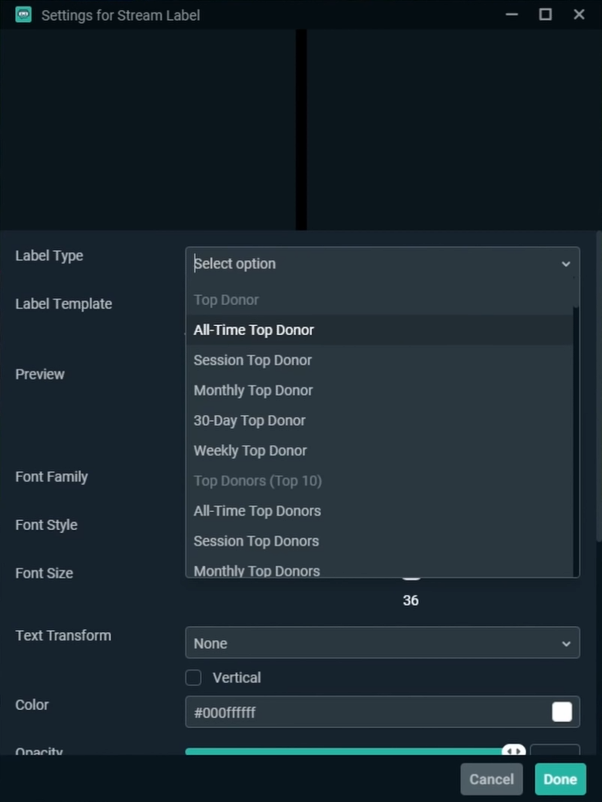
A preview of the stream label you selected will appear in the window. You can change a few settings like font style and font size before adding it to your scene, or you can leave everything at the default settings. If you have an overlay pack, you may need to change these settings to make it more suitable for your graphics.
4. Click Done.
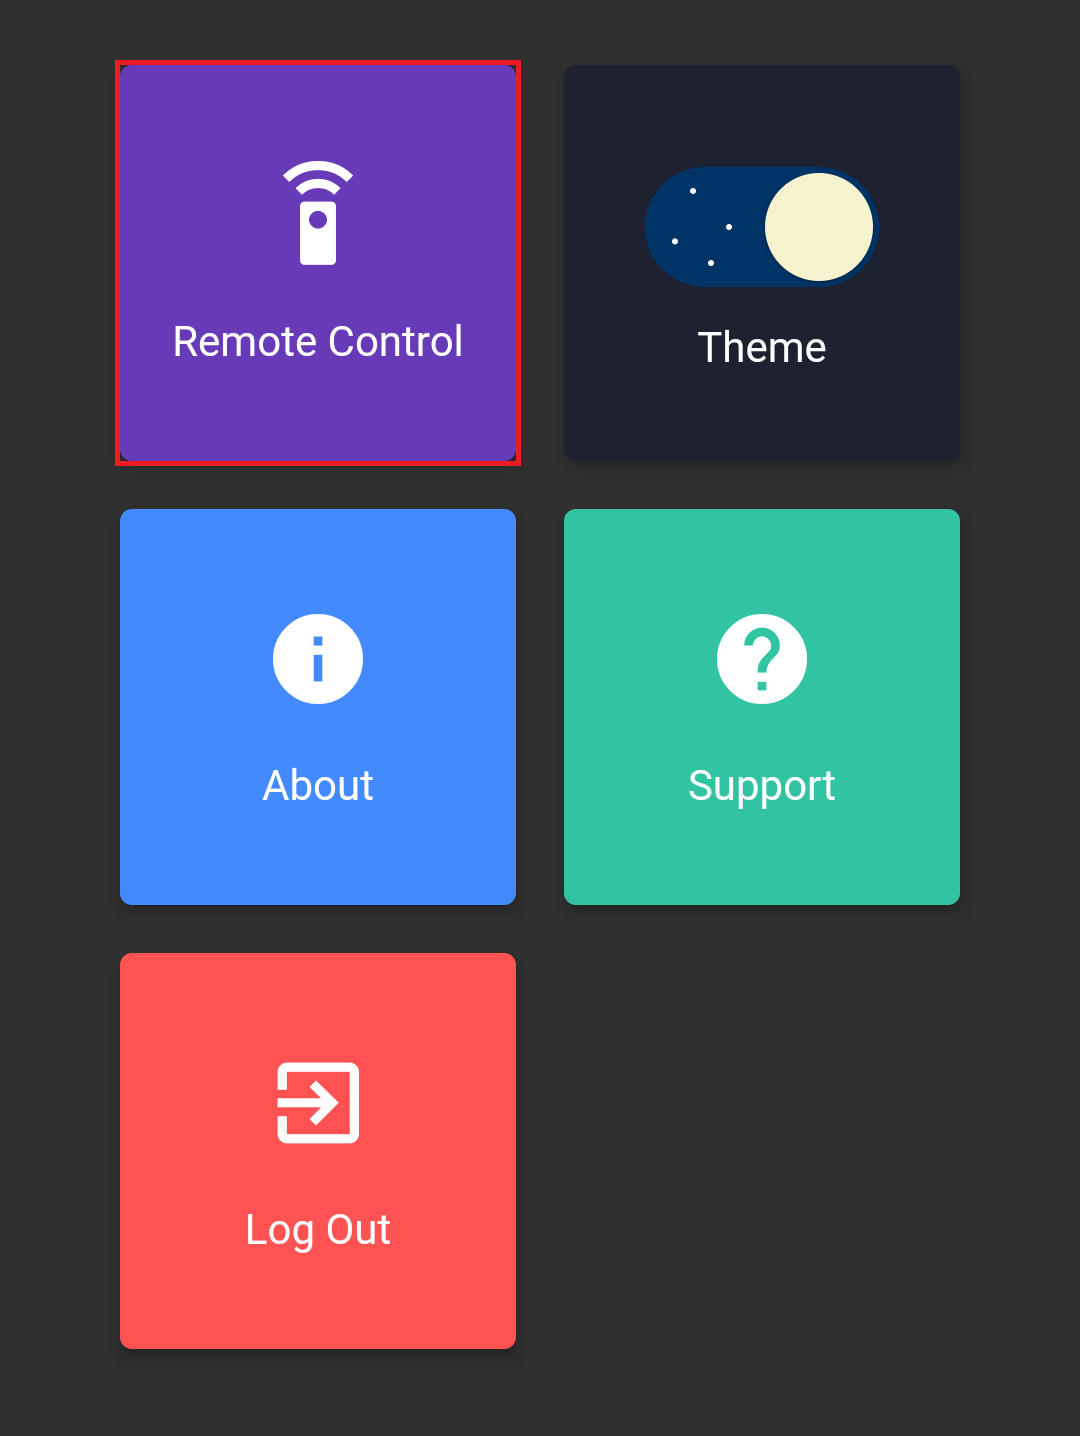
Remote Control
Changing from scene to scene using Streamlabs OBS can be quite a hassle as you have to minimize your game window constantly. Fortunately, you can use the remote control feature provided by Streamlabs Deck to change scenes from your phone and up your production quality.
To take advantage of the remote-control feature:
- Go to Streamlabs OBS and open the Remote Control tab.
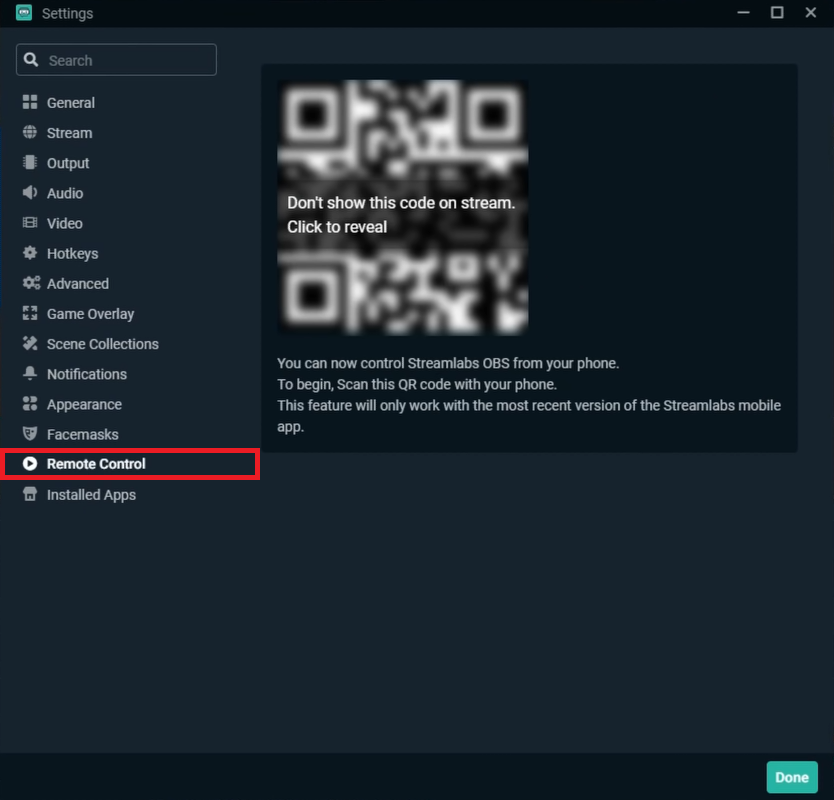
2. Reveal the code as you’re going to scan it using your smartphone in the next steps.
3. Go to your smartphone’s app store and download Streamlabs Deck.
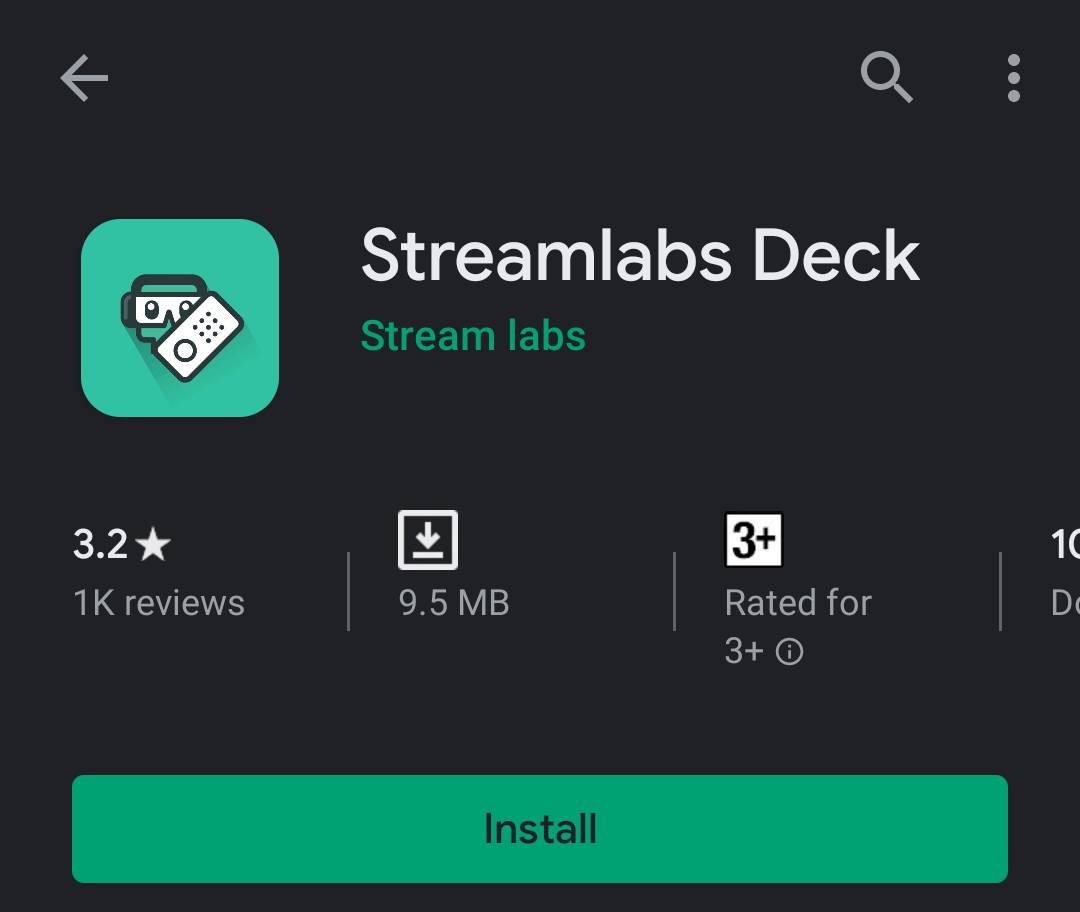
4. Log in using your Twitch account.
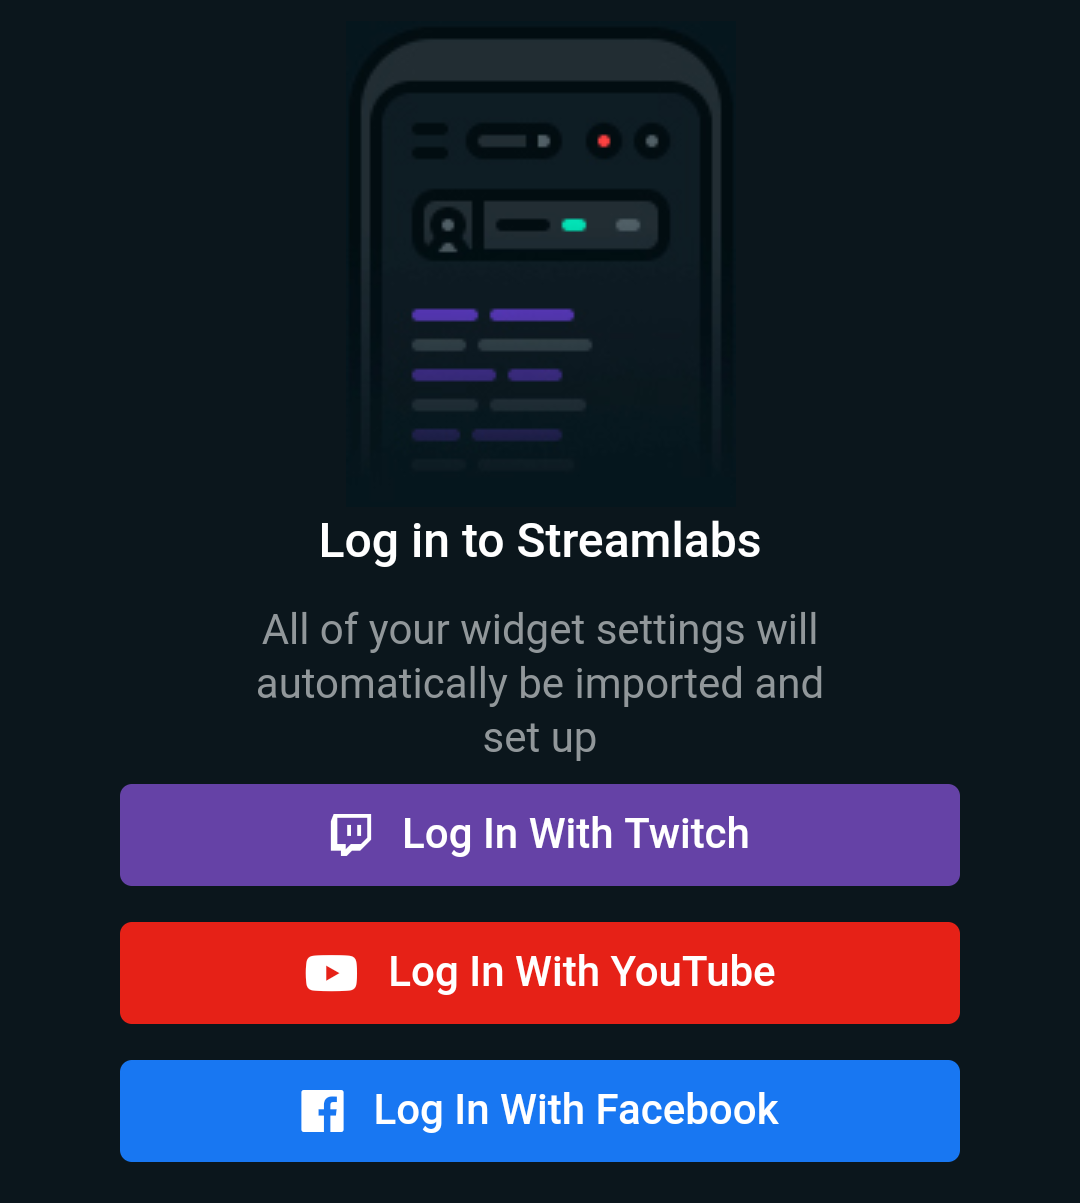
5. Open the Settings tab and go to Remote Control.
6. Scan the QR Code with the camera on your smartphone.
After successfully linking your Streamlabs OBS account to Streamlabs Deck, you can now switch between scenes remotely via your smartphone. This feature is extremely useful, especially when you’re streaming games that have extended loading times or constant match-finding.
Another useful feature that Streamlabs Deck offers is the ability to enable and disable audio sources. Overall, it is a very well rounded and simple tool that helps improve the general quality of your stream.
If you want something similar with even more functionality, you can purchase an Elgato Stream Deck. Although having one is not a streaming necessity, it is a wonderful addition to your setup and a great investment if you’re looking to stream for the long haul.
5. Add Engaging Alerts to Your Scenes
Alerts are an essential aspect of your stream as they incentivize your audience to interact with your channel. Basically, with alerts your viewers’ usernames flash on the screen every time they follow, subscribe, or donate.
Streamlabs OBS makes it easy to add and customize alerts:
- Add a new source and select Alertbox.
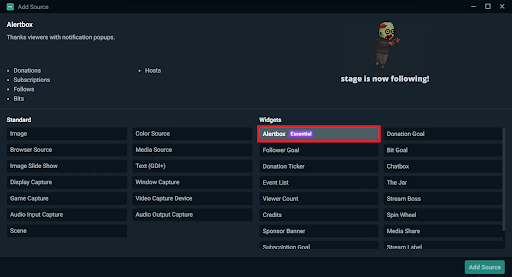
2. Assign a name to the source.
A menu with a bunch of customization options will appear. From here, you can add animations and assign different graphics, sounds, and more. If you’re not using an overlay pack, keeping everything at default settings is absolutely fine.
3. Add the same source to your other scenes and scale the alerts accordingly.
Minimum Requirements to Stream in 720p60 on Twitch
You may be wondering if your current system is powerful enough to handle streaming on Twitch with the configuration we recommended above. The answer to your question largely depends on what encoder you want to use. As we discussed earlier, Software x264 is CPU-intensive while NVENC New is GPU-intensive and requires you to have an NVIDIA RTX Series GPU.
Aside from meeting the demands of your encoder, you must also consider whether your hardware can run your games at playable settings. The hardware we recommend below meets the minimum requirements to stream in 720p60 and play most games in 1080p60.
Software x264 Minimum Requirements
Streaming with the Software x264 encoder requires a CPU with at least four cores and eight threads. Software x264 takes a large number of dedicated threads to get a good encode.
| CPU | Intel Core i7-2600 or AMD Ryzen 5 1400 |
| GPU | NVIDIA GeForce GTX 1060 or AMD Radeon RX 570 |
| RAM | 8 GB |
Hardware NVENC New Minimum Requirements
On the other hand, Hardware NVENC New is less stressful to your CPU and delegates the encoding to your GPU. The only downside to using Hardware NVENC New is the hefty price tag.
We’re going to stick with the CPUs from minimum requirements for Software x264 as they provide excellent gaming performance without bottlenecking the least expensive GPU that supports Hardware NVENC New.
| CPU | Intel Core i7-2600 or AMD Ryzen 5 1400 |
| GPU | NVIDIA GeForce RTX 2060 |
| RAM | 8 GB |
Console Streaming
So what if you want to start streaming on Twitch but don’t have a capable PC?
Don’t worry: you can still stream on the platform with your gaming consoles.
Console streaming is much less complicated if you have a PlayStation 4 or an Xbox One since both of these systems have integrated streaming features that allow for an easy and user-friendly process. All you need is a stable Internet connection, your system’s proprietary camera, and a headset with a decent microphone.
Streaming on PlayStation 4
PlayStation 4 users have it the easiest when it comes to streaming since the console has integrated support for Twitch. Starting a stream on the PS4 is as simple as pressing the Share button while in-game, and you can even provide voice commentary through a headset.
To start a stream on your PS4:
- Link your Twitch profile to your PS4 from the Account Settings tab in the main menu.
- Boot up the game that you want to stream.
- Press the Share button on your controller.
- Select Broadcast Gameplay.
- Select Twitch as your streaming service.
- Give your broadcast a title.
- Start broadcasting.
Comments from your live viewers will appear through a narrow scrolling window on your screen. Ending your stream is also a piece of cake: all you have to do is press the Share button.
Streaming on Xbox One
Streaming on the Xbox One is a little more complicated than with the PS4, but the process is relatively simple. The requirements are similar, and you can even use the built-in microphone on the Kinect Sensor for voice commentary. However, using a headset microphone will give you much better input-audio quality.
- Download the Twitch Xbox App from the Store tab on your dashboard.
- Open the Twitch Xbox App and link your account.
- Boot up the game that you want to stream.
- While the game is running in the background, go back to your dashboard and open the Twitch Xbox App.
- Select the Broadcast button. Doing this should reopen your game and shrink the Twitch Xbox App to a window on the right-hand side of the screen.
- Select Broadcast Title and assign a name for your broadcast.
- Check the Settings and change the configuration according to your preferences. Make sure the microphone is enabled if you want to give voice commentary.
- Click Start Broadcast.
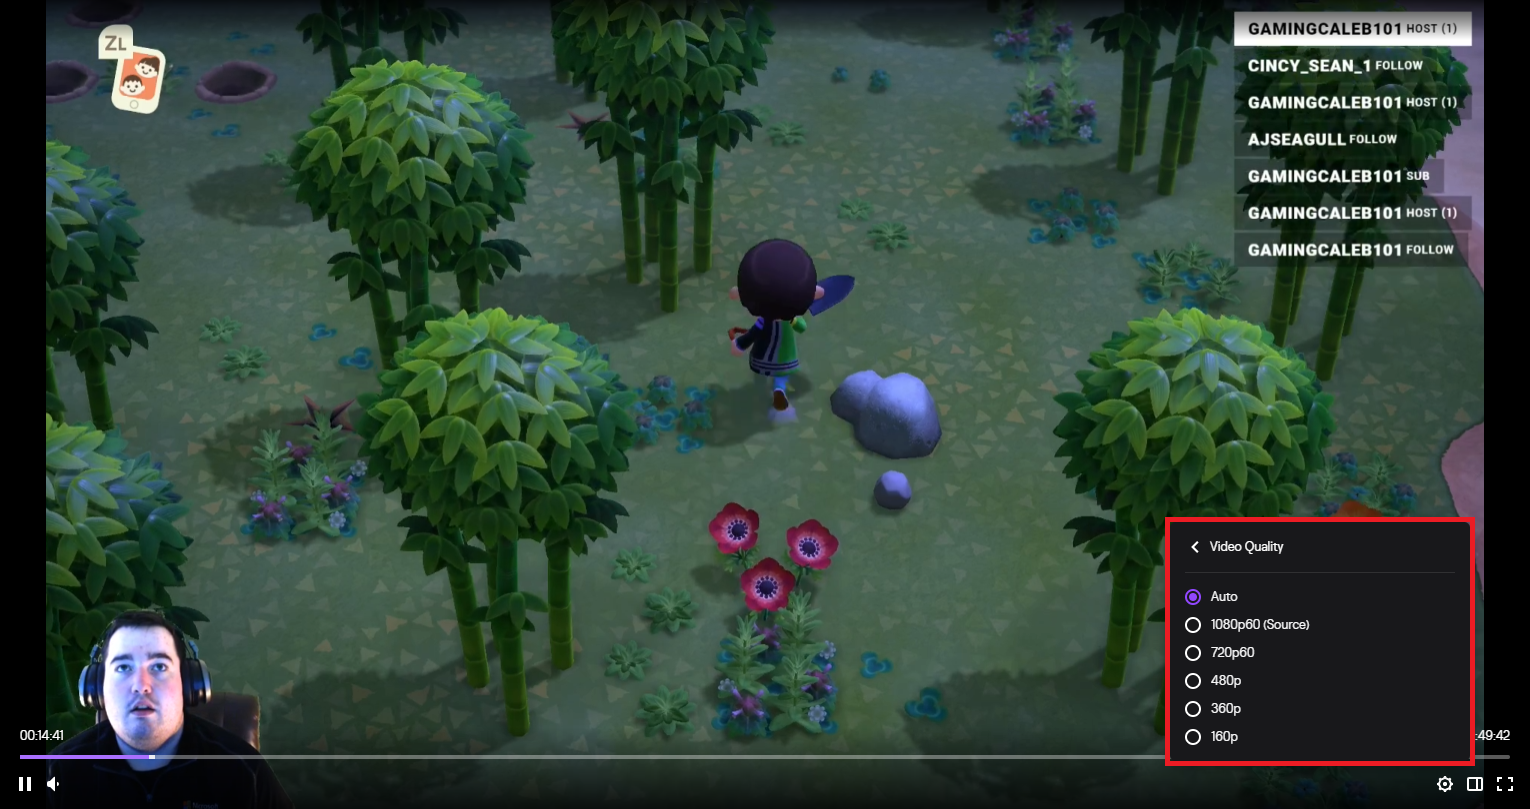
You may want to ask a friend to view your stream and check the video and audio quality. If your Internet connection struggles to stream your content, you can lower the video quality from the Settings menu.
Streaming on Nintendo Switch
Streaming on the Nintendo Switch requires a bit more tedious work compared to the PS4 and Xbox One. You’re going to need a few extra tools like a capture card and streaming software.
It is also important to consider that the Switch must be docked to stream gameplay. That means you can’t stream on Twitch if you have a Switch Lite.
So the main components you’re going to need are a computer, a capture card, a decent pair of headphones with an integrated microphone (or a condenser microphone), and Streamlabs OBS. In the setup below, we’re using the Elgato HD60 S capture card.
Follow these steps once you have everything you needed:
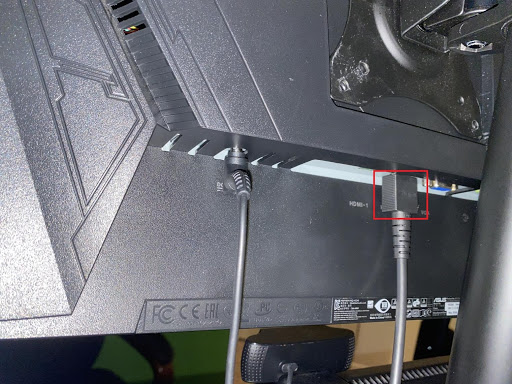
- Disconnect the HDMI port from your TV or monitor and connect it to your capture card.
- Connect the capture card to your computer via the USB Type-C port.
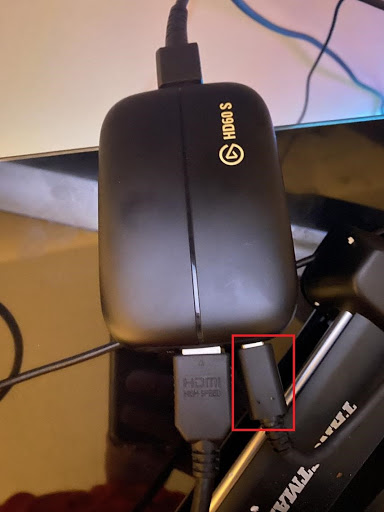
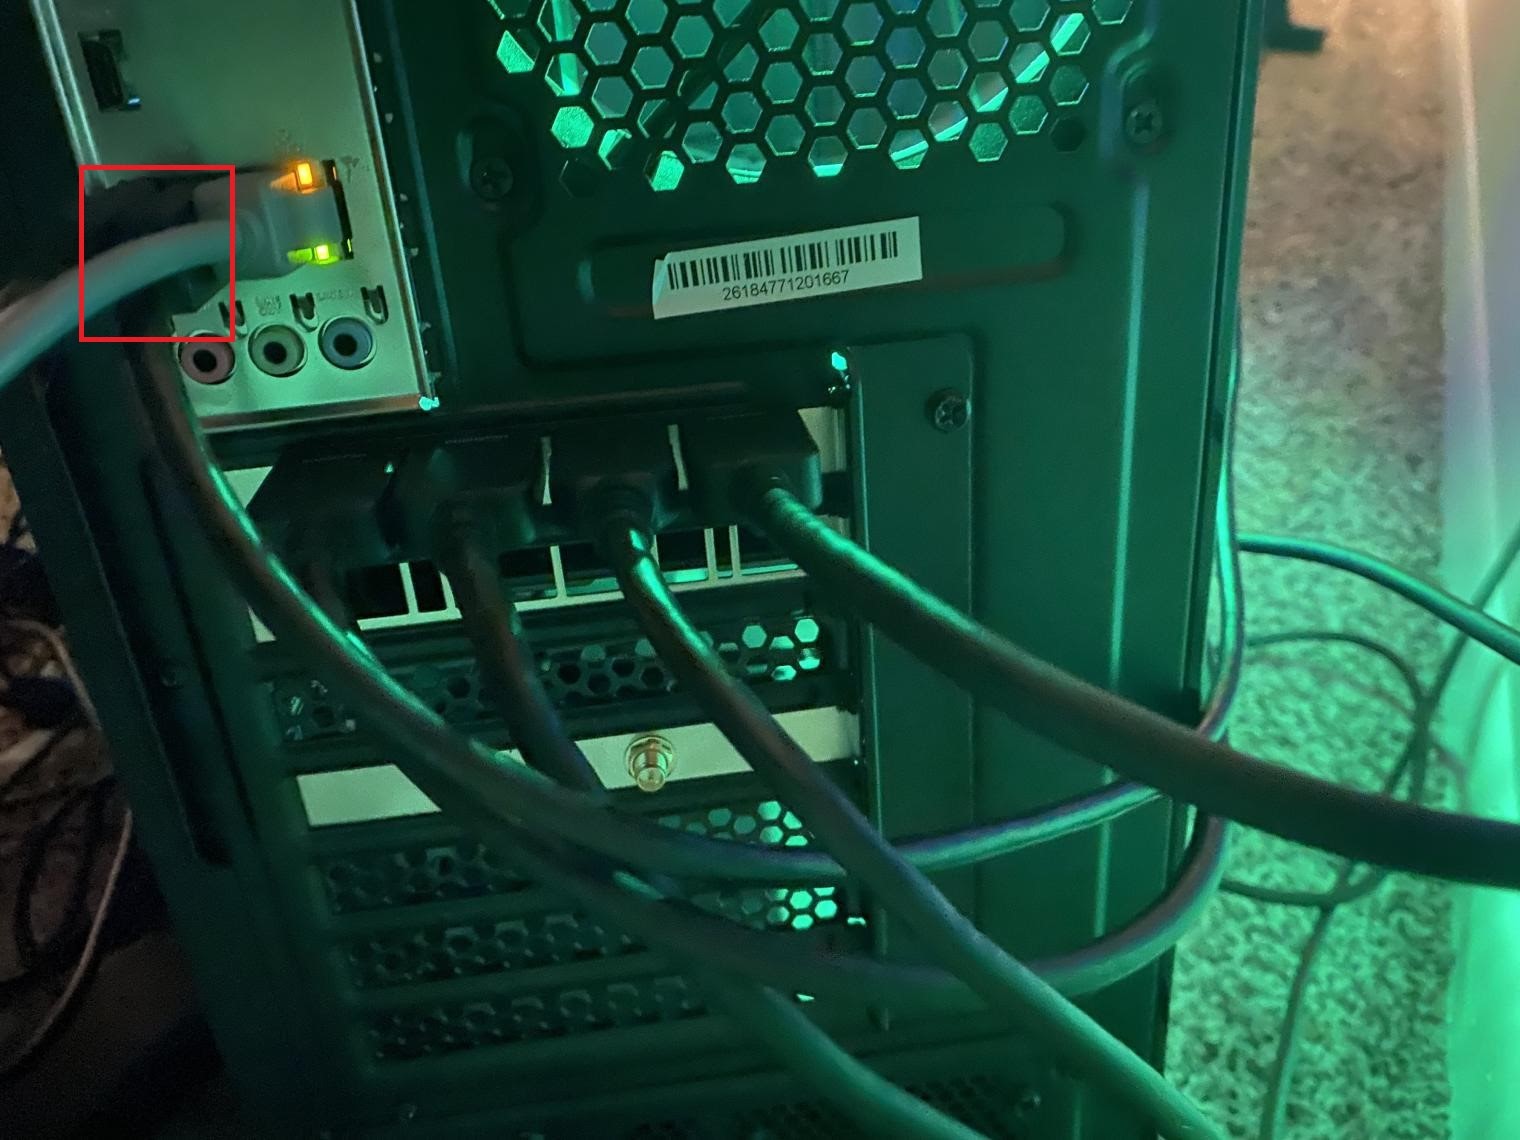
3. Connect your capture card’s HDMI output port to your TV or monitor’s HDMI input port using a second HDMI cable.
Here’s what a complete setup can look like:
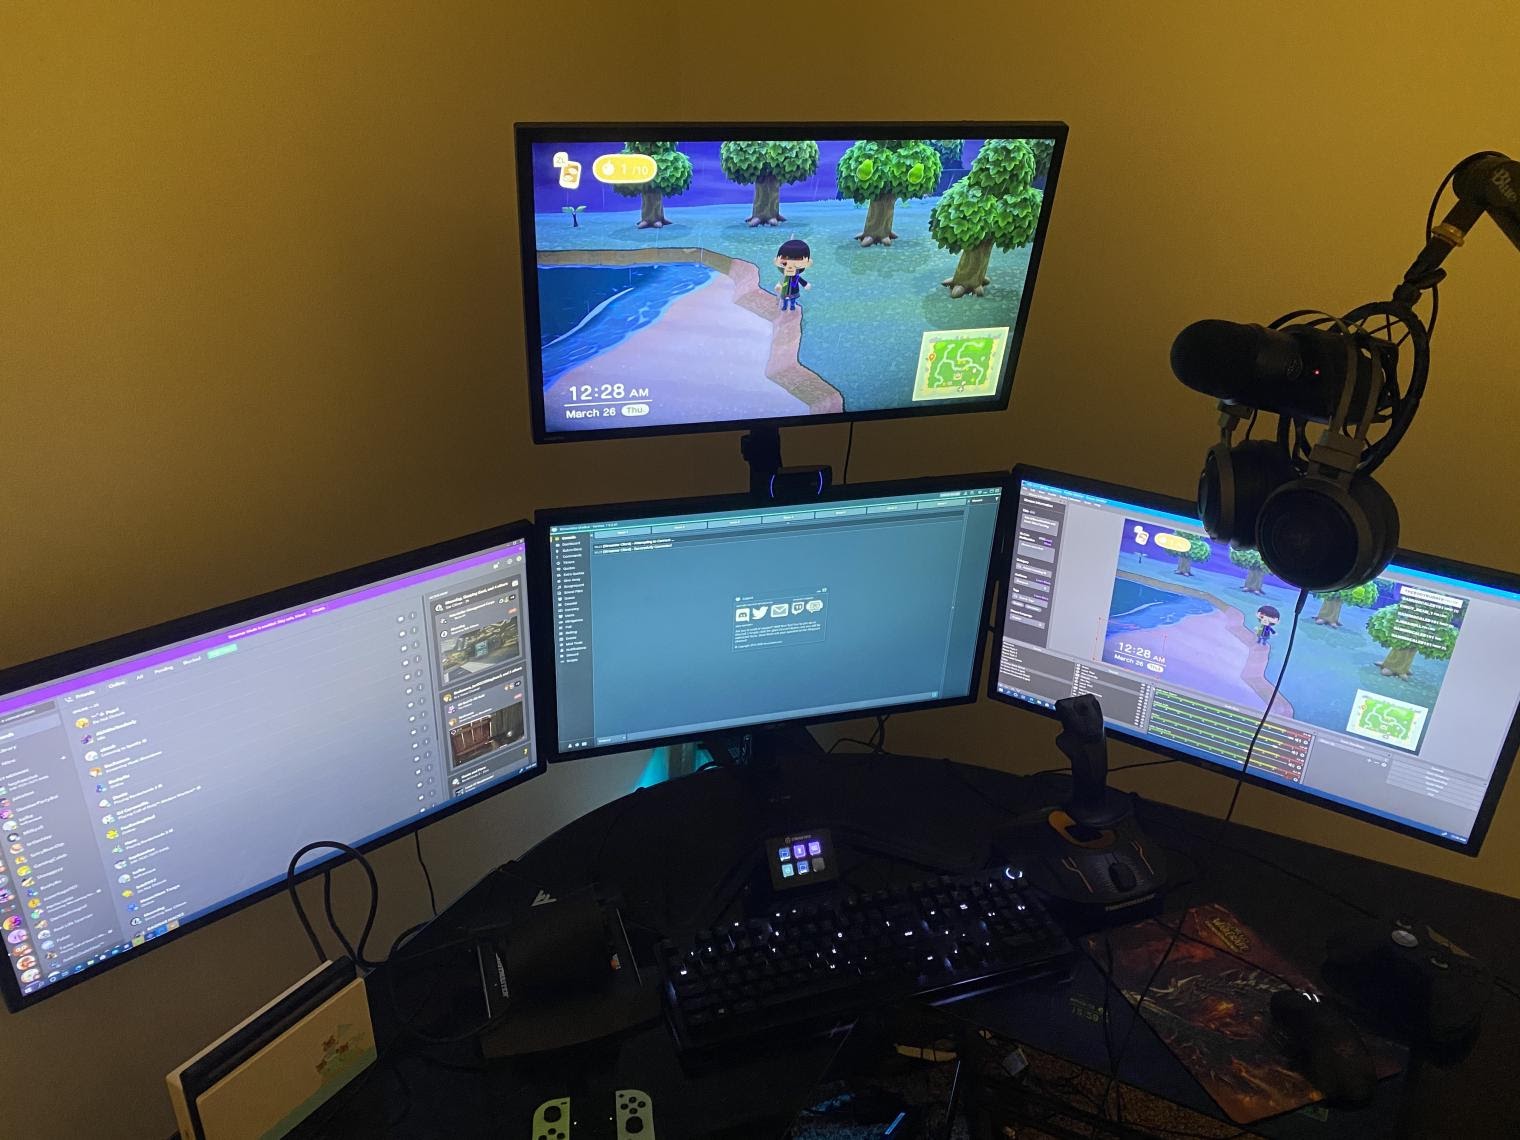
Keep in mind that you don’t need four monitors to start streaming. As long as you have the essentials covered, you’ll be okay.
That’s it as far as the physical set up is concerned.
Now open Streamlabs OBS using your PC and do the following:
- Add a new source and select Video Capture Device.
- Assign a name to the source.
- Click Done.
- Select Elgato Game Capture HD from the Device drop-down menu.
- Enable Deactivate when nothing is showing and leave every other setting at default.

- Click Configure Video to open the Elgato Configuration Menu.
- Tweak the video settings of the capture card to your preferences.
- Select your Nintendo Switch as the Input Device.
- Set Profile to HD 720 and have 60 fps enabled.
- Click Done.
If your Nintendo Switch is turned on and you configure the Video Capture Device source correctly, the feed from your Switch should appear on the Streamlabs OBS interface.
The best part about streaming with a capture card is that you can take full advantage of the features that Streamlabs OBS has to offer. You can also use a capture card to take your PS4 or Xbox One stream to the next level. Moreover, capture cards like the Elgato HD60 offer added software that helps you have full control of your stream.
Beginner Tips for Streaming
So what do the experts in the field have to say to beginners who want to get into streaming?
Don’t over invest, especially not if you’re diving into streaming because of the current crisis. Start small and build up. Basic necessities that we see at StreamKick are a facecam and a mic. Our data indicates these are two of the most compelling factors for keeping viewers once they’ve discovered a channel. Aim for steady improvement, not perfection.
Ricky Dunbar
StreamKick
Buddy up to keep yourself sane. No matter your skills and charisma, you won’t attract followers overnight, or in a few weeks at that. Stream with a buddy, preferably someone already established so you can learn the ropes from an experienced user. You’ll instantly have someone to interact with during your streams, and this will help endear people to you if/when they happen upon your streams and enjoy your interactions.
Dustin Vann
Owner and CEO at Trusy Social
Keep Talking
While it can feel weird to keep talking without an audience, it is actually really important to do so when you start streaming. When you’re live, anyone can jump in at any point, and if they see you just staring awkwardly at your screen, they’re not going to be interested and will leave immediately.
If you’re talking the moment they view your live stream, they’re going to get a better sense of who you are, get interested, and maybe even stick around a little longer. Just keep talking, and you’re bound to get used to the feeling eventually. This practice will also make you more quick witted, outgoing, and extroverted.
Socialize
Do your best to meet other streamers and get to know them. You can even ask for some advice from them and learn a thing or two. Streaming is a community, and like most communities, people want to help out each other.
What Are the Best Games to Stream on Twitch in 2020?
Game choice can be a tough question. Ideally, it should be something the streamer actually enjoys playing for extended lengths of time. The audience picks up on that sort of thing quickly. Battle royale titles like Warzone are hot and offer loads of variability, which is great both for entertainment and audience engagement. We’re seeing Warzone streamers capturing great viewership share, but it’s also a saturated category. These kinds of titles, as well as MOBAs, also offer unlimited replayability – perfect for streaming.
Ricky Dunbar
StreamKick
I have two favourites. Fifa 20 – it really brings the formula of football to life for a video gamer. You can either create your dream team and just get on with the game, or you can delve deep into the game on career mode, making use of the numerous features and using coins, players packs, and such. Street Fighter 5 – this is the best version of the game released yet, with over 200 costumes so you can design to your heart’s content. With 34 game stages and 40 characters, there are endless hours of fun to be had.
Dustin Vann
Owner and CEO at Trusy Social
Wrap-up
That concludes our comprehensive guide on how to start streaming on Twitch. We hope you’ll explore the possibilities of the platform and create content for yourself. If you have any questions or need points of clarification, feel free to speak your mind in the comments section below.


Great article, truly the best starter’s guide for one’s streaming settings.
Thank you!
Thanks for helping me to gain new ideas about pc’s. I also contain the belief that certain of the best ways to help keep your notebook computer in excellent condition has been a hard plastic-type material case, or perhaps shell, that matches over the top of one’s computer. A majority of these protective gear are generally model unique since they are made to fit perfectly above the natural casing. You can buy all of them directly from the owner, or from third party sources if they are designed for your notebook computer, however only a few laptop could have a cover on the market. Once again, thanks for your suggestions.
Pretty! This was a really wonderful article. Thanks for providing these details.
Great article. I am experiencing some of these issues as well..