
Even though many people struggle to set up their Blue Yeti microphone, this is a very easy process that can be finished in just a few minutes.
The Blue Yeti microphone is one of the most popular microphones on the market, but it seems like many people are not able to set it up the right way without a brief explanation. Even though this is a very simple device mostly aimed at beginners in the tech world, the whole setup process will take you some time, and you need to be careful and make sure you don’t make a mistake.
This microphone may have been launched more than a decade ago, but it seems like people still love it and also still struggle with connecting it to their devices. Its versatility makes it a great option for all sorts of things, from gaming to podcasting, and once you start using it, there is no way you will ever opt for another microphone.
Want to find out how to setup Blue Yeti microphone and install it properly on all of your devices without any troubles? You are in the right place. We will thoroughly take you through each step of this process and make sure your experience with this device will be impeccable.
Contents of this Page
Install the Blue Yeti Microphone Driver To Your Windows Device
Step 1: Open The Official Blue Yeti Website
If you want to connect your Blue Yeti microphone to your device, you will first have to install the official Blue Yeti driver. When you connect the microphone to your PC or laptop, you will see the installation file in your Download folder. Click on it and let the installation finish.
Step 2: Open the Speaker Icon On The Toolbar
![]()
Once you click on the speaker icon that can be found in your Windows toolbar, you will be presented with several options, and you need to click on the one that says “Sound”.
Step 3: Choose the “Playback” button
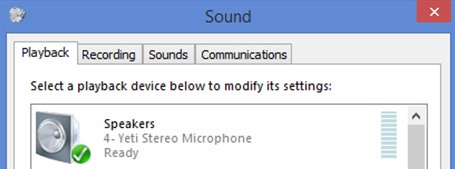
When you click on the Playback button, you will see all of the devices that are connected to your PC, and you have to choose one. In this case, you will click on the “Blue Yeti Speakers” and set it as a default playback device.
Step 4: Click on “Blue Yeti Speakers” Again
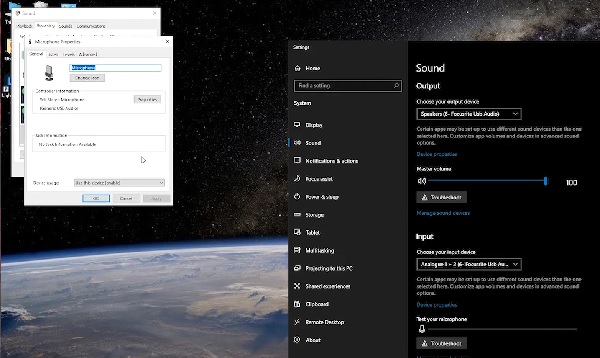
Now, when you click on this button, you will be presented with a “Properties” tab, and you will have to click on a button that says “Advanced”.
How To EASILY Set Up A Blue Yeti For Live Streaming | Blue Yeti Microphone Tutorial
Step 5: Check All Allowed Applications
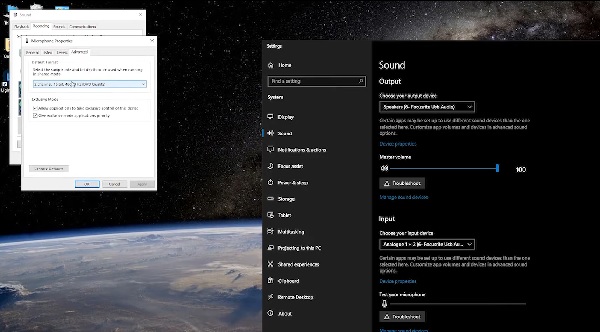
In the “Advanced” tab, you will see a special section called Exclusive Mode, and you will have to check all the apps that are allowed in this one. After you do that, click “Apply” and then “OK.”
Step 6: You’re Done!
Your microphone should work now. If you want to see how to setup your Blue Yeti microphone for streaming, check our “How to Easily Set Up A Blue Yeti For Live Streaming” section below. Alternatively, you can further your Blue Yeti audio performance by following our “How to Get the Best Use Out of Your Blue Yeti Microphone” section.
Install The Blue Yeti Microphone To Your Mac Device
Step 1: Download The Official Blue Yeti Driver
The how-to guide we have presented you with above will probably work only for Windows devices, so we decided to provide you with a simple guide that will allow you to install this cheap microphone to your Mac computer too. However, you will still need to install the official Blue Yeti driver on your computer and connect your microphone to the PC.
Step 2: Open Apple System Preferences
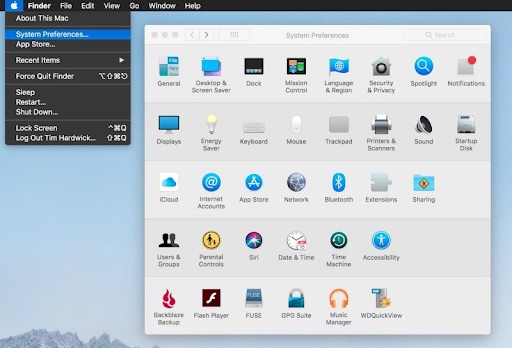
In your Menu bar, you will find a simple Apple icon, and once you click on it, you will get access to your system preferences.
Step 3: Choose the “Sound” button
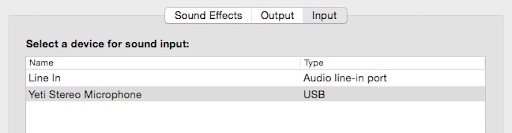
When you open the Sound button, you will see the Input and Output tabs where you will have to choose the Blue Yeti microphone as your preferred microphone. After this, your microphone should be working without any problems.
How To Easily Set Up A Blue Yeti For Live Streaming
How To Get The Best Use Out Of Your Blue Yeti Microphone
Even though the Blue Yeti microphone will work just fine with all sorts of computers and laptops, it is always best to keep it connected to some sort of a voice or sound program that can make the experience even better.
If you want to get the highest quality sound while using your Blue Yeti microphone, I would recommend using the Studio One Artist or Audacity. Not only will they help you control the sound completely, but you will also be able to fix parts of the recording that are not so clear or maybe have some sort of background noise.
Once you pair your Blue Yeti mic to some of these programs, you will be able to get the best sound ever.
FAQ
Should I Connect My Blue Yeti Microphone Through An USB Cable?
If you are connecting your Blue Yeti microphone to your computer or laptop for the first time, you will need to use the USB cable you received in the package; otherwise, you will not be able to connect it to your device properly.
Why Do I Need To Install The Blue Yeti Driver Before I Start The Setup Process?
This is the easiest way you can install the Blue Yeti microphone to your device, and in case you don’t download the driver first, your Blue Yeti device will not be able to connect properly. Once you install both the driver and the device, the company guarantees you a high-quality experience and promises you will never have any problems with your sound.
What Setting Should I Choose Once I Setup My Blue Yeti Microphone?
This mostly depends on your needs, but the best setting that will give you the clearest and most natural sound is definitely the Cardioid mode. It is also the best option for streaming and all sorts of podcasting.
Conclusion
Even though Blue Yeti a budget streaming microphone, many people love it.
True, it might be a bit confusing to set it up properly, and people are struggling with setting up their Blue Yeti microphone to their device, but this is a very simple process that definitely won’t take you more than 5 minutes.
All of this can be finished with just a few simple clicks, and you will be able to do everything properly even if you never installed any sort of device before. Make sure to follow our guide carefully and check twice before you make any of these steps because you don’t want to find yourself in trouble.


