
Miniatures make any D&D game alive. Through miniatures, players can visualize how their enemies look like and they can even plan ahead in every encounter. Miniatures also look cool on display shelves and drawer counters. Another great thing about miniatures is the fact that they are customizable right from the start.
Do you want to make your own miniatures from scratch? This article will cover the essentials of making D&D miniatures, as well as some product suggestions to help you become a skilled miniaturist or hobbyist.
Making D&D Miniatures – The Important Steps
Prepare Your Ideas
All creative projects begin with drafts of ideas. These ideas undergo a process of refinement before finalization. Before getting your tools and resources, try to imagine the type of minis that you want to create. Do you love plain soldiers or heroic adventurers? How about ferocious dragons and other ancestral D&D monsters like Beholders? Miniature ideas are endless, but not all of them are realistically possible.
You can start by sketching your favorite miniatures. A sketch will help you figure out dimensions and aesthetic parts. By analyzing a miniature sketch, you can estimate how much the project would cost.
Showing your sketches to an artistic friend is also a wise strategic move. Your friend can offer insights regarding the sketches, improving the final outputs. Make sure that you compensate your friend for his or her creative insights.
Choose A Miniature Material Type
With dozens of miniature materials to choose from, you can never run out of ideas and designs. Some materials are easier to use, while others require initial crafting experience.
Paper is one of the easiest and cheapest materials that you can use. A long sheet of paper can be turned into a sturdy miniature material base, and it can even hold a pre-made design. One downside of paper is limited flexibility. The material is not as flexible as molding clay or resin, and it can’t achieve a full 3D aesthetic without using a non-standard technique.
Cardboard is the better version of paper because of its sturdiness and dimensions. Through careful folding and positioning, you can create a decent 3D effect for the minis. The 3D effect might lead to a ‘blocky’ result, but this can easily be ignored during a D&D session. If you want faster and easier results, try using pre-made cardboard cutouts instead.
When it comes to long-term value and pure aesthetics, Polymer clay (molding clay) is the best choice. Polymer clay can take any form or shape, allowing free-form miniature sculpting. You should use polymer clay if you want to make personalized miniatures like mighty adventurers, strong villains, or even poignant NPCs.
If Polymer clay is best for beginners, epoxy putty is the solution for pros or experienced miniature builders. There are numerous brands of epoxy putty in the market, but the most popular is the Green Stuff – also known as Kneadatite. Green Stuff is more stable than clay, albeit it is very sticky and difficult to work with. Plus, Green Stuff is a fast-curing agent so you have little time to dawdle while sculpting a mini.
Poly Plasticene (or just Plasticine) is a simple alternative to polymer clay. Many enthusiasts love to use plasticine because of its non-toxic nature and versatility. Plasticine is a reliable molding base material and goes well with rubber silicone. One problem with poly plasticine is its low heat tolerance. Don’t leave your plasticine mold in a high-temperature room or it will melt!
Start With A Few Small Minis
Before attempting to make large, highly detailed miniatures, you should start with smaller versions. This way, you won’t feel overwhelmed by the entire process and the level of details that you have to work with. Additionally, smaller minis have a lower margin of error so you can try unique creation techniques now and then.
Soldiers and minions are excellent starters because of their size. They also cheap and can be ordered by bulk. One of the simple ways to create D&D minis is to buy generic soldier or warrior pieces and recast them into something more unique. You only need molding clay and an average-sized mold made of plastic frames or blocks.
Making your first small-sized mini is like testing the waters. If you get the hang of the process, you can take commission work from other D&D players and hobbyists. Or perhaps you can even have a personal miniature for every D&D character you have!
Make Big Batches of Minis Gradually
As you become more experienced making small miniatures, you can gradually move on to big batches (medium or large-sized). This transition is not too difficult if you have a big inventory of materials and tools. Some important tools that you should have are holding trays, molding frames, cutters, mixing cups, long stirrers, and personal safety equipment.
Aside from passion or love for the hobby, one reason why hobbyists make multiple miniature batches is profit. The finished miniatures can be sold over an online store or a physical hobby shop. If you intend to go in this direction, you must have a solid branding plan and a starting community of followers. These followers can become buyers or referrers in the long run.
Fundamental Steps to Painting Minis by Goobertown Hobbies:
Best Tools That Can Help You Make Cool D&D Minis
Tools are required for any miniature-making project. Without reliable tools, you can’t build a miniature or recast your favorite options.
Listed below are some useful hobbyist tools that you can order online.
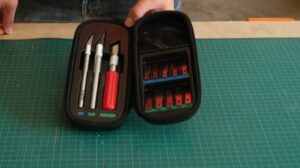
Mandala Crafts Model Tool Kit
Pros:
- A complete set of basic crafting tools
- Sharp and precise
- Affordable
Cons:
- Tweezers bend easily
- The file has a barely passable quality
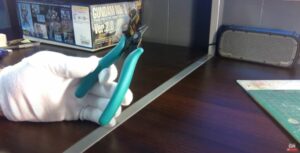
The Mandala Crafts model tool kit is an excellent set of tools for miniature makers and scale modelers. Within the kit, you’d find important tools such as a cutter, penknife, sharp blades, file, polishing bars, and tweezers.
If your budget for miniature tools is low, you won’t have a problem with the Mandala Crafts toolset. For less than $15, you can have a set of durable tools for a long time. The tool kit also has a convenient storage box to keep all the tools safe.
The kit’s tweezers feel a bit flimsy, so be careful using them. Don’t use the tweezers on sections that are hard to pluck. Another minor issue of the kit is the low-quality file tool. You probably need to file a section many times before getting a neat, polished result.
X-ACTO Compression Knife Set
Pros:
- Strong and sharp knives
- Multiple replacement blades
- Nylon case for storage
Cons:
- Small kit inconsistencies
- Zipper problem
X-ACTO is still the undisputed brand when it comes to knives for scale modeling and miniature-making. The X-ACTO compression knife kit is a must-have set because it contains three sharp knives meant for different cutting and carving techniques.
The default X-ACTO blades are also replaceable. Simply remove the current blade through a twisting motion and attach the new one. Aside from blades, you can also attach a chisel-head into the X-ACTO handle.
One problem with the X-ACTO knife set is its inconsistent kit design. Some of the replacement blades won’t fit the case, and you need to push harder to close it. Compounding this problem is the kit’s faulty zipper. Sometimes, you’d have a difficult time pulling the zipper up, eventually leading to tremendous wear and tear. To resolve this problem, you can just get a separate case and secure the knives in there.
Miniature Metal Table Vice

Pros:
- Lightweight yet durable
- Great for keeping frames stable
- Easily adjustable
Cons:
- The clamping jaw feels a bit loose
Positioning a miniature for painting or recasting can be tricky. With just a slight bump against the table, the miniature or molding frame might fall down. The solution to this dilemma is a strong yet adjustable table vice, particularly the one from YOU+ store.
Despite its strength and apparent bulkiness, the YOU+ table vice is actually lightweight and can be placed in small storage bags or cases. The vice is made of aluminum alloy, so its parts won’t suffer from wear and tear easily. The adjustment handles also have rubber grip-ends to reduce finger strain as you adjust the clamp’s tightness.
The miniature table clamp from YOU+ is reliable but not perfect. Sometimes, you might feel that clamp is too loose, so proper adjustment is needed. Always double-check if the vice is positioned properly on the table and the clamps have a strong grip on the model.
Necrons with the New Warhammer Paint Set by Sword ‘n’ Steele:
Things to Consider Before Making D&D Miniatures
Are you excited to build your first batch of miniatures? Before you jump into the hobby, there are some important things that you must consider.
Mind Your Health and Safety
While working with miniatures, you have to handle various chemicals and solutions. Most of these chemicals are not hazardous, but they can cause mild irritations or allergies. Try to get a starting pair of gloves and face mask before working on your project.
If you have kids, make sure that they can’t reach your working area or materials. Kids love to experiment, and they might end up eating putties and molding clay. They can even play with molding frames and mess up your miniature recasts.
It’s also wise to invest in large stacks of old newspapers. These newspapers can be used to cover tables and minimize chemical staining.
Do Not Overbuy Stuff
At first glance, making miniatures is overwhelming because of the number of tools and resources needed. You can even see different types of materials displayed in the workrooms of Youtube miniaturists. If you feel intimidated with the costs or resources involved in miniature making, simply minimize your scope. You don’t have to overbuy things right away.
These are the essential things that you must purchase first:
- Miniature sculpting tools
- Molding clay
- A few paint bottles
- Standard, ready-made bases
After making your first miniature and you decided to delve deep in the hobby, then that’s the right time to buy extra materials. You wouldn’t want to run out of materials in the middle of a miniature project!
Always Have Extra Cups and Stirrers
Beginner miniaturists tend to forget about having extra plastic cups to hold chemical solutions. Some beginners even love to purchase costly cups instead of affordable transparent versions. Having a permanent cup to mix your molding formula is a great choice, but you should have extra cups on standby. With additional cups, you can test different putties or start a batch recasting of your favorite minis.
Additional stirrers are as important as cups. Stirrers degrade over time, so you must have a few ones ready for quick usage.
Recast Popular Models and Paint Them Differently
In the world of miniatures, form and color are usual competing concepts. Form is all about the way the miniature is assembled or built, while color is all about the paint style. Many professionals believe that a remarkable paint job can save a deformed miniature and even lead to a unique creation. Others believe that a miniature’s quality and texture can affect paint cohesion over time. Somehow, the painting process is a ‘saving grace’ of all miniatures.
Recasting allows your creativity to flow like a river. You can start a recasting work by choosing an awesome miniature and putting it into a mold. Once the mold is complete and the blank miniature is ready, you can paint it in any way you like!
Don’t worry too much if the form of the recast miniature is not perfect. Through careful shading or airbrushing, you can hide inconsistencies and other errors.
Be Aware of Your Working Room’s Ventilation
After making a sketch of your miniature ideas, the next step you must do is to check your working room. Make sure that the room is not too hot. Otherwise, your materials might melt or become soggy in just one session.
Ventilation is another important aspect. If you’re working with chemicals, constantly moving air is the best way to minimize exposure. Get an electric fan near your table to help drive away fumes and odors while regulating temperature.
Use Miniature Ideas from Non-D&D Sources
D&D is not just the main source of miniature ideas and templates. Some of the popular games with awesome miniatures are Warhammer Fantasy, Warhammer 40K, Mage Knight, Pathfinder, and Dungeon World.
By recasting non-D&D minis, you can create a unique miniature that fits the general theme of your game. It’s even better if you’re the DM – you’d have another strange monster to pit against your players!
Repurpose Damaged Miniatures
There is almost no wasted stuff in the realm of miniatures. If a miniature is damaged beyond repair, its parts can be taken out and repurposed for new designs. You can even use damaged limbs and attach them to a base body, creating a grotesque golem for your collection.
Even though damaged miniature parts can be removed easily, they might incur additional damage. Some smaller sections might flake off, affecting the part’s general texture. At this rate, you need to rely on personal judgment. If you want to dismantle a big D&D model, you can choose to save the big parts instead of the smaller ones.
Watch out for damaged mechanical models such as ships, siege weaponry, and sentient weapons. These models have extremely sensitive parts that can fit minis of the same type. Repurposing such rigid minis or models require precision and care.
Make Miniature Accessories and Weapons
Creating accessories and weapons for your miniatures is a great method to keep the hobby fresh and interesting. With extra miniature weapons in your stock, you can change the stances of your minis as often as possible. Extra accessories will complement the miniature designs and create a better visual appeal.
Polymer clay is the best material for making accessories and weapons. Since these complementary parts are small, they can dry out fast. This can be advantageous if you wish to make large batches of miniatures for a project.
Useful Tips and Tricks for Making Miniatures by Robert Tolone:
A Quick Guide on 3D Printing Miniatures
As a hobbyist or miniaturist, you probably won’t need a dedicated 3D printer. However, if you’re aiming to secure enterprise solutions or large-scale miniature projects, having a 3D printer is a great professional move.
It’s not easy to own a 3D printer, however. The device is expensive, and its parts are complicated or difficult to maintain.
Here are some important things to do before you start 3D printing miniatures:
Get A Simple Yet Reliable Printer
The 3D printing industry is rife with buzzwords, topics, and rapidly changing concepts. These things drive the hype of many printers, especially the new ones in the market. Avoid these pitfalls and simply focus on 3D printer brands that have been around for a long time.
Some competitive brands are Mendel, Prusa, and resin-friendly Formlabs.
Be Ready With Operational Costs
Even though you’re not printing houses or superfoods, your project will still rake up expenses in terms of electrical costs, filaments, templates, and other resources. Standard miniatures will possibly set you back by $30-50 per printing – final modifications excluded. The first few prints might also have errors, so you need to allot a bigger ‘slack’ for repeating the designs.
To stay on top of operational costs, you should consider joining 3D printing communities or chat networks. This way, you’d know the current standard rate for filaments or replacement parts. You might even learn a thing or two from experienced 3D printing enthusiasts.
Prioritize Paid STL Repositories
With dozens of legitimate STL file providers, you will never run out of opportunities to print exciting designs. Many STL files are free, while others require one-time payment or continuous subscription. The difference between paid and free STLs is quality.
Instead of looking for free D&D miniature STL files, you should go for premium ones with great quality. Find STL designers with reliable experience backed up by a solid portfolio. Analyze their miniature designs and figure out if they match your desired project.
If you know your way around CAD software like Blender or Maya, you can make custom STL designs. This process will take time but might help you save a couple of bucks.
Be Careful with Resin
If you’re planning to use resin as a primary material for your 3D-printed miniatures, you must exercise the proper safety measures. Resin can cause allergies, especially when exposed to heat and light. You must also check if your 3D printer can handle resin as a printing material.
The cheapest yet effective post-printing cleaning solution that you can have is Isopropyl alcohol. Simply damp a piece of cloth with alcohol and run it over the work area and finished outputs. Don’t forget to clean the printer bath as well.
Tips on How to 3D Print Miniatures on a FDM Printer by Tomb of 3D Printed Horrors
Making Miniatures for D&D – FAQ
Is it expensive to make my own miniatures?
Answer: It depends on your chosen process. 3D printing is expensive, while using cardboard cutouts is virtually cheaper but less detailed. You might also need a budget for outsourcing creative work.
Are cardboard cutouts great alternatives to resin or plastic?
Answer: Cardboard cutouts are great alternatives if you managed to find cool pre-made designs. You can find these designs from online forums and D&D communities.
Do I need the latest 3D printer to make a miniature?
Answer: No, unless you have a dedicated budget for 3D printing. There are other cheaper alternatives that can yield awesome aesthetic effects, but you need to work harder to achieve them.
How long is it to make a large-scale dragon miniature?
Answer: If you’re using a 3D printer, it will take five hours and more. Complicated minis require tons of details and colors. With other methods of miniature creation, the time spent on the model will take even longer.
Do I need to paint a finished miniature?
Answer: It depends on your chosen miniature type. Resin and plastic miniatures definitely need paint colors for a better visual effect. Cardboard minis don’t require paints because they rely on cutouts and pre-made designs.
Conclusion
Making D&D miniatures requires more than just creativity. You need dedication, patience, tools, and resources to make a batch of minis. Once everything is ready for your D&D miniature project, you should organize a schedule and start right away.
Don’t forget to show your miniatures to your friends. They might be impressed and ask you to commission their miniature ideas!


